CVC highlight: DIY veterinary rehabilitation for patients with patella and cruciate injuries
Dr. Wardlaw discusses some therapeutic alternatives to get orthopedic patients comfortably back on their feet.
Physical rehabilitation is becoming common in veterinary medicine. Several benefits have already been proved, and more continue to be elucidated. In patients with patella and cruciate injuries, rehabilitation is the main part of conservative therapy. But you may be hesitant because of the cost of some of the equipment required. Below are various methodologies you can readily apply in your clinic at minimal extra cost.


Jennifer L. Wardlaw, DVM, MS, DACVS
Heat therapy
Goals: Superficial heat can provide analgesia, decrease muscle spasms, increase impulse conduction, increase fibrous tissue elasticity, increase vasodilation, and decrease blood pressure (if heat is applied for long periods).
How to do it: Apply warm packs for 10 to 15 minutes before a therapy session. Use hot packs, heat wraps, warm water, or towels immersed in hot water. Don't use electric blankets because of their unpredictable hot zones and potential for burns. Don't place the packs directly on the skin; instead, place them in a cloth or towel. Check intermittently that the skin is not too hot.

THINKSTOCK/ANDREW JALBERT
DIY tip: Create your own hot packs by immersing towels in hot water or dampening the towels and warming them in the microwave. Then put the towels in a plastic bag, and place it on the affected area. Be sure the towels are not so hot that they cause burns.
Cryotherapy
Goals: Cold therapy can reduce a patient's inflammation, edema formation, muscle spasms, and pain.
How to do it: Just as physical rehabilitation sessions start with heat therapy, cryotherapy can be used for 10 to 15 minutes after each session is finished. You can use commercial ice packs or frozen bags of vegetables. Always place insulation between the cold source and the skin, and inspect the skin every few minutes. Sanitize cold packs between patients to prevent nosocomial infections. It is also recommended to cover incisions with vitamin A and D ointment or a triple antibiotic ointment to prevent the damp layer from potentially infecting the fresh surgical site.
DIY tip: Create your own ice packs by adding 1 part rubbing alcohol to 3 parts water in a plastic bag.
Walking
Goals: Walking exercises can increase range of motion, promote normal gait and placement, improve muscle mass and strength, improve circulation of the blood and lymphatic vessels, increase endurance, and prevent joint degeneration.
How to do it: Place a leash on the patient, and position the patient on a firm surface that provides good footing. Walk the patient slowly so the patient has adequate time to place each limb on the ground and shift its weight to that limb, ensuring even therapy throughout all limbs. As the patient improves, you can increase the speed of walking and eventually allow the patient to run on the leash. Other exercises that can be performed on a leash include:
- Inclined walking—Walk the patient up a gradual incline or short flight of stairs. This increases hindlimb muscle mass and strength as well as flexion, extension, and range of motion.
- Figure-of-eight pattern—Walking a patient in a figure-of-eight shifts its weight on all four legs and increases the amount of body weight forced on each leg as the patient turns.
- Squats—Sit-to-stand exercises help build quadriceps and hamstrings. You can have patients perform these periodically during walks or have them do repeated sets of stationary sit-to-stands. Make sure the dog sits with both legs under the rump. You can encourage this by placing the weaker leg against your leg or having the patient squat in a corner or against a wall.
DIY tip: If your practice doesn't have a flight of stairs, make your own out of wood. The stairs should be 10 to 12 in deep for most patients and have good footing material on them that can also be cleaned, such as rubber mats or outdoor carpeting. The ideal height will vary depending on the size of the patient.
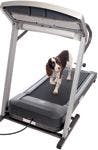
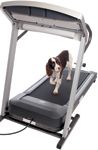
Treadmills
Goals: Treadmill walking can reduce pain, make the patient bear weight on the affected limb to strengthen its muscles, and enhance cardiovascular health. Treadmills achieve a greater range of motion for flexion and extension when compared with walking on the ground. This is particularly helpful for dogs with cruciate injuries since the lameness is associated with not only a loss of muscle mass but also a loss in extension.
How to do it: Sessions can range from a few minutes to more than 30 minutes if you are building endurance. Two people should always be present when therapy is being performed, and the patient should be on a leash. You can stand in front of the patient to encourage it to keep walking, behind or above the patient to support it and keep it from falling, or beside the patient to support the patient and possibly help with gait and range of motion. Never have a treadmill facing a wall because the dog will not walk forward. Start with the speed slow (< 1 mph) until the animal is used to walking on the treadmill.
DIY tip: Purchase a human treadmill, which is usually less expensive, and modify it for use for pets by adding side walls. If you purchase one that doesn't allow you to change the incline, you can easily accomplish this yourself as well by placing two-by-fours under the front of the machine.
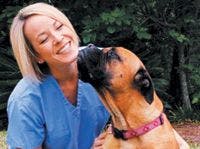
Hydrotherapy
Goals: Hydrotherapy can reduce edema and fluid pooling due to hydrostatic forces (the pressure of water exerted equally on all surfaces of the body in water), improve muscle mass and strength because of resistance to water, improve range of motion, increase endurance and weight loss, and decrease pain.
How to do it: Entice the patient to move in the water (find what motivates the dog, like food, a ball, a rubber duck—but don't force it). Never leave the dog unattended, and make sure the patient doesn't become fully submerged. For patients with patellar injuries, fill the tub with water to the level of the greater trochanter at first to create buoyancy. Gradually lower the water level for increased resistance as recovery progresses.
DIY tip: Use your large practice bathtub as an underwater treadmill. Just fill the tub to the appropriate water level, and encourage the patient to walk back and forth in the tub.
Jennifer L. Wardlaw, DVM, MS, DACVS, Gateway Veterinary Surgery, St. Louis, Missouri
Listen in
To hear Dr. Wardlaw discuss the first and foremost factor in rehab, why "no pain, no gain" doesn't apply, and how to set up a rehab protocol, scan the QR code above, or go to dvm360.com/CVC13Wardlaw.


 in general practice")


