How to perform a two-portal laparoscopic ovariectomy
Learn more about this laparoscopic procedure.
Many reasons exist for performing ovariectomies instead of ovariohysterectomies in healthy bitches. Compared with ovariectomy, ovariohysterectomy in dogs is technically more complicated and time-consuming and is likely associated with greater morbidity (larger incision, more intraoperative trauma, increased discomfort).1 No significant differences between the two procedures have been observed for the incidence of long-term urogenital problems, including endometritis, pyometra, and urinary incontinence.1 In addition, there is no benefit and, thus, no indication for removing the uterus during routine neutering in healthy bitches.1
Further, a recent study concluded that laparoscopic-assisted ovariohysterectomies caused less surgical stress and up to 65% less postoperative pain than a traditional open surgical spay.2 Thus, I believe that performing ovariectomies laparoscopically further reduces the incision size, tissue trauma, and overall level of pain experienced by the patient compared with performing an open ovariectomy or open ovariohysterectomy. And because of video magnification of the laparoscopic image, some surgeons think it is easier to visualize the ovary during laparoscopy than during an open procedure, helping to ensure complete removal of the ovarian tissue.3

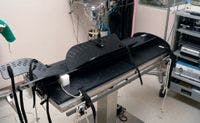
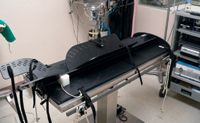
Figure 1
I encourage all veterinarians interested in incorporating laparoscopy into their practices to take basic and advanced courses offered by The University of Georgia, Colorado State University, and elsewhere before applying this technique. I hope that my describing this technique in detail will help facilitate its acceptance and use in practice and its further refinement. I also hope my experience with the technique will help veterinarians avoid certain pitfalls that I have learned the hard way.

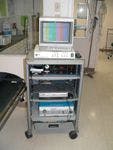

Figure 2
EQUIPMENT NEEDED
The equipment and instruments required to perform laparoscopic ovariectomy in dogs and cats are listed below. All personnel involved in performing laparoscopic surgery will need appropriate training in the procedure as well as in cleaning, disinfecting, sterilizing, and maintaining the instruments and equipment.
- A laparoscope and cannulas/cannula-trocar assemblies. In my practice, I use a 5-mm-diameter, 0- or 30-degree field-of-view rigid endoscope with a working length of 28 to 33 cm with the threaded Ternamian EndoTIP (Karl Storz) 6-mm cannula for the primary camera/caudal portal in all dogs and cats. The metallic, threaded Ternamian EndoTIP cannula is used without a trocar and, thus, offers a safer entry technique and reduced slippage.4,5
For the secondary operative/cranial portal in cats and small dogs (< 20 lb), I use a 5-mm cannula-trocar assembly. In small patients in which I am concerned about instrument interference, I use the PassPort trocar (Patton Surgical), which is shorter (55 x 5 mm), for the operative/cranial portal. In medium (> 20 lb) and large dogs, I use a 10- to 14-mm cannula-trocar assembly. I have found that using a larger-diameter cranial cannula-trocar assembly in larger patients facilitates ovarian extraction, and the surgeon is less likely to drop the ovary or seed the abdomen with ovarian tissue during extraction. I use Autosuture's Versaport cannula-trocar assembly equipped with the Versaseal feature (Covidien) as the operative/cranial portal in medium and large dogs because it often allows ovarian extraction without losing the pneumoperitoneum.
- An adjustable surgical table or tabletop positioner that allows patient repositioning intraoperatively, rotating right or left to elevate one side. I use the TT Endoscopic Positioner (Apexx Equipment) (Figure 1).
- A laparoscopy tower (Figure 2) with a video monitor, a camera, a computer with recording hardware and software (I use AIDA Vet software [Karl Storz]), a camera head, an insufflator, a carbon dioxide gas cylinder (with full backup tank available), an insufflator line, a light source (with backup bulb), and a light cable. Ensure that the camera head, insufflator line, and light cable have been gas-sterilized or that sterile camera sleeves (e.g. Karl Storz) are available. When placing a sterile sleeve on the light cable, make sure the tape that secures the sleeve to the cable end does not depress the release where the cable attaches to the laparoscope.
- A large gas-sterilized box (I use a Stack and Store Tool Box [Plano Molding] with ½-in drilled vent holes; Figure 3) containing the laparoscope and other surgical instruments and supplies needed for the procedure: four towels (inside), a large paper drape (outside, on top, and large enough to completely cover the patient and the instrument stand at the tail end of the surgery table), a Veress needle, an insufflation hose, a camera head, a light cable, a large needle holder, a No. 2 nylon suture with a large swaged needle (e.g. Ethilon 2 with cutting LR needle [Ethicon]), an EndoTIP 6-mm threaded cannula, a 5-mm cannula-trocar assembly, a 10- to 14-mm Versaport or equivalent cannula-trocar assembly, and endoscopic Babcock or rat-toothed forceps or graspers (e.g. V. Mueller Endolap 5-mm cobra-toothed grasper [Cardinal Health]). All cannulas should have an insufflation stopcock for added flexibility. I use pipe insulation with cutouts to protect the laparoscopes and EndoTIP cannulas inside the box. Additionally, the large sterile wrapper used for this box can be spread on the countertop for endoscopic instrument placement.
- A general surgery pack and a No. 11 blade if using the Storz EndoTIP; otherwise use a No. 15 blade.
- A bipolar electrosurgical unit or equivalent. Although this procedure can be performed with other endosurgical coagulation or ligation instruments, including lasers6 and harmonic scalpels,7 I use the LigaSure Vessel Sealing System (Valleylab) with a 5-mm LigaSure V Sealer/Divider hand piece for cats and small to medium dogs and a 10-mm LigaSure Atlas Sealer/Divider hand piece for medium-large to large dogs. Since this is a bipolar computer-driven vessel sealing and cutting system, no grounding plate is needed. Vessel sealing is activated with the power button on the instrument handle or the foot pedal, and it automatically deactivates once the proper amount of sealing energy has been delivered.
- 10-mm Autosuture Endo Clips (Covidien) vascular clips. Keep these vascular clips in reserve in the rare case of uncontrolled bleeding.
- A laparoscopic suction or irrigation unit.
- Wall-mounted monitors on each side of the surgery table will greatly facilitate the procedure.
CAUTIONS AND CONTRAINDICATIONS
If uterine disease is present (pyometra or mass) or if the animal is pregnant, it is best to perform or convert to an open procedure. When removing an enlarged uterus or an ovarian mass through a small portal site, a risk of rupturing the uterus or seeding the abdomen with tumor cells exists. However, if the diseased or gravid uterus can be safely removed laparoscopically, a third portal would need to be created just cranial to the brim of the pelvis on the midline, and the entire uterus with both ovaries attached would be removed through this most caudal portal (see "Laparoscopic-assisted ovariohysterectomy: An overview" in this article). The contraindications for laparoscopy are listed in Table 1.

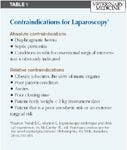
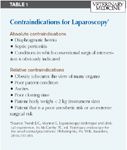
Table 1: Contraindications for Laparoscopy
THE TWO-PORTAL LAPAROSCOPIC OVARIECTOMY TECHNIQUE
Before performing a laparoscopic ovariectomy, inform the owner about the procedure, and obtain a signed permission-to-treat form (including permission to convert to an open procedure, should it be necessary) and a signed estimate form that specifically states laparoscopic ovariectomy. Also, make sure all equipment is sterilized, and prepare the patient, including evacuating the bladder (see the related sidebar titled "General laparoscopic ovariectomy setup instructions for technicians"). I also instruct my technician to administer 20 mg/kg cefazolin intravenously during induction. If any perceived breaks in sterility occur during the procedure, I continue appropriate antibiotic therapy.
Step 1: Position the patient
Position the widely clipped animal in dorsal recumbency on an endoscopic patient positioner that has been securely attached to the surgery table. Secure the patient with the positioner's straps and buckles, making sure the upper thigh straps are secure since they will help hold the patient's legs open when the patient is rotated into the lateral position. Do not use the surgery table ties to secure the patient's legs. Adjust the front of the positioner so the open area between the front sliding V and the fixed caudal V is wide enough to allow easy access to the portal areas and the ovarian tacking sites lateral to the third and fourth mammary glands. Tape may be needed to secure smaller patients instead of the straps. Make sure enough space is available to move easily around the caudal end of the surgery table to the other side. Temporarily place the instrument stand to the side of the tail end of the surgery table. Aseptically prepare the surgical field in the standard fashion.
Step 2: Drape the area
Have a nonsterile assistant open the sterile box pack cover and place it toward the backsplash of available counter space. After donning a cap, a mask, a gown, and gloves, the surgeon removes the large paper drape from the top of the box and places it to the side on the sterile cover drape. The four towels and six towel clamps are used to drape the wide abdominal area. Place the cranial and caudal towels first, and then clamp in the first side towel to the cranial towel. Next, clamp it again farther dorsally following the rib cage to just short of the prepped edge (near the last rib), and place the final towel clamp, securing it to the caudal towel. Do the same on the opposite side.
Step 3: Arrange the instruments
Arrange the instruments for chronological use on the surgery counter (Figure 3) from left to right: the Veress needle, insufflation hose, No. 11 or No. 15 blade (not pictured), suture pack, 5-mm Storz EndoTIP cannula, and another 5- to 14-mm cannula-trocar assembly (depending on the patient's size). Remove the trocar from the cannula-trocar assembly and place it and the cannula side-by-side. Place the camera head and light cable next and the endoscopic grasper toward the back next to the laparoscope.


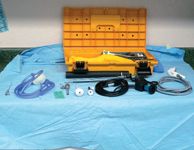
Figure 3
Step 4: Further positioning and site preparation
Have an assistant move the instrument tray to the tail end of the surgery table and place the tower at the head of the table. I generally do not tilt the surgery table head down (Trendelenburg position8 ) unless I have difficulty locating the ovaries. Place the large paper drape over the toweled-in area, and cover the area from the patient's head to the instrument tray stand.
Have the assistant open the outer wrap on the general surgery pack and place the pack on the drape-covered instrument stand (the pack's weight helps keep the drape in place when the patient is moved from side to side). Next, cut the drape over the two portal entry areas (see below for the exact location of the portals) and secure the drape with four towel clamps.
Run the insufflation, light cable, and camera head lines through the cranial and caudal towel clamps (use the eyes and lock boxes) to help keep the lines in the sterile field (Figure 4). Hand the assistant the filter end of the insufflation line to be plugged into the insufflation unit.

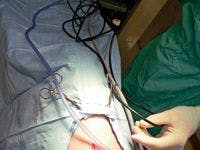

Figure 4
Step 5: Insufflate the abdomen at the primary camera/caudal portal site
Using your caudal hand, grasp the movable outer portion of the Veress needle hub (not yet connected to the insufflation hose), and, with your cranial hand, carefully grasp the abdominal wall on the midline at the umbilical area and elevate it without incorporating any intestine or the spleen. Place the tip of the Veress needle perpendicular to the elevated abdominal wall, about one-fourth of the distance caudally from the umbilicus to the pelvic brim. I place the Veress needle in this caudal portal location to decrease the risk of inadvertent damage or insufflation to the stomach, spleen, or liver. Place the index finger and thumb of your caudal hand on the needle hub, and place your ring finger on the shaft of the needle far enough up to just allow abdominal penetration. This finger-brace depth-stop helps prevent excessive abdominal penetration.
Next, direct the needle in a cranial dorsal direction through the elevated abdominal wall (Figure 5). When you think the abdomen has been penetrated, use the hanging drop test9 to check: put the Veress needle valve in the open position, place a drop or two of sterile saline solution in the needle's hub, and watch for the saline solution to go into the needle as a result of the negative abdominal pressure. If the drop does not disappear into the hub, carefully advance the needle a millimeter at a time while watching the drop in the hub.

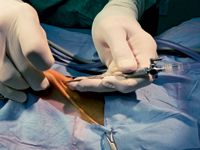
Figure 5
Once the saline solution disappears into the needle, attach the insufflation line to the Veress needle, turn the carbon dioxide gas on, and start insufflation. The Veress needle is guarded, so the safety obturator will cover the needle point once in the abdomen.10 Once pneumoperitoneum to 15 mm Hg is achieved, turn off the stopcock on the Veress needle, and remove the needle from the abdomen. If the pressure is greater than 15 mm Hg, disconnect the insufflation tubing and use the stopcock on the side of the Veress needle to deflate the abdomen to 15 mm Hg. If the abdominal pressure exceeds 15 mm Hg, patient respiration will be impeded.
Step 6: Place the laparoscope at the primary camera/caudal portal site
After removing the Veress needle, use a No. 11 blade to make a careful stab incision in the center of the caudal portal site. After penetrating the abdomen, place the threaded EndoTIP cannula tip in the incision, and rotate it clockwise with its valve open until you hear gas releasing through the valve. Then turn its valve off, and rotate the cannula tip one to three full rotations more to fully place it intra-abdominally. Attach the insufflation hose to this cannula, and reestablish a pneumoperitoneum pressure of 12 to 15 mm Hg.
If you do not have an EndoTIP cannula, use a Versaport 5-mm cannula-trocar assembly or equivalent with an insufflation stopcock. Remove the trocar, and at the intended camera/caudal portal, make a midline impression with the cannula in the skin caudally one-fourth the distance between the umbilicus and the brim of the pelvis. With a No. 15 blade, make a small full-thickness skin incision across the cannula impression on the midline, plus 2 mm (total incision length should be about 7 mm—just long enough for the cannula-trocar unit to pass).
Then use the same technique as for the caudal portal incision to make a skin incision for the operative/cranial portal (to make the correct incision length, add 2 mm to the cannula diameter) on the midline, at a point exactly between the umbilicus and xiphoid process.
At the caudal portal site with the trocar in place, angle the instrument toward the bladder, and gently penetrate the abdomen with the cannula-trocar combination. When using Versaport-type cannula-trocar assemblies with cutting blades, grip them properly so that they are armed. To do so, squeeze both the upper (trocar) and lower (cannula hand-grip) portions together so that the blade will protrude with pressure on the tip. Again, use your free hand to grasp the cannula and provide a safety depth stop so that you do not penetrate too deeply. Keep the blade centered on and parallel to, not perpendicular to, the linea alba. Attach the insufflation line to the stopcock, and maintain the abdominal insufflation pressure at 12 to 15 mm Hg.
Next, attach the camera head and light cable to the laparoscope (the camera head, which has a cable that connects it to the camera unit in the tower, attaches with a C mount to the end of the laparoscope, while the light cable connects directly to the light post on the laparoscope), and always keep the camera head cord tail pointed toward the floor. With a 30-degree laparoscope, keep the light post directed toward 12 o'clock (to maintain the visual field down toward the ovaries) to help orientation. With a 0-degree scope, the light post position is not important, but the camera head tail position should be directed toward the floor (6 o'clock) to help maintain orientation. Place the laparoscope tip on a piece of sterile gauze, and have a technician perform a white balance adjustment. Then place the laparoscope through the caudal camera portal, and direct the laparoscope cranially until the intended cranial portal entry site is seen.
Step 7: Create the secondary operative/cranial portal
This portal does not require an insufflation stopcock, but it is recommended in case of inadvertent removal of the camera/caudal portal with the insufflation stopcock.
Establish the operative/cranial portal where the cranial skin incision was made earlier (midway between the xiphoid process and the umbilicus on the midline) by using the same technique as for the first portal. With the camera directed toward your second portal site, and, using the armed cannula-trocar combination, gently enter the abdomen in a cranial and caudal rocking motion, angling the trocar caudally away from the stomach and spleen. When introducing a cannula-trocar unit into the abdomen using only one hand, extend your middle finger along its shaft to act as a depth-stop to prevent excessive penetration. Use the camera to observe that the trocar tip avoids the spleen and other organs (Figure 6). Then have an assistant reduce the abdominal pressure to 8 to 10 mm Hg for the rest of the procedure.
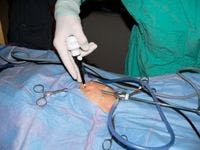
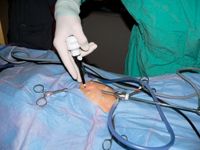
Figure 6
Step 8: Adjust the patient position
I stand on the patient's left side to remove the more easily located right ovary first. Using the patient positioner, rotate the patient so the right ovary is uppermost (left side down). I face the wall monitor and maintain a baseball diamond orientation.11 I have the ovary at home plate, I am at second base, the portals are at first and third, and I use the ceiling or wall monitor opposite me as I perform the procedure.

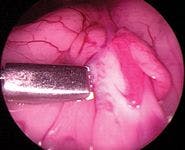
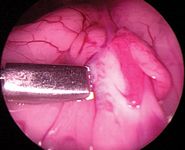
Figure 7
Step 9: Tack the right ovary to the abdominal wall
Pass a 5-mm endoscopic Babcock forceps or equivalent through the operative/cranial portal, and direct it and the laparoscope just caudal to the right kidney to locate the ovary. It is often necessary to first find the ovary (Figure 7) and grasp the ovarian suspensory ligament or the ovariouterine juncture and apply gentle traction to lift the ovary into the visual field and toward the lateral abdominal wall on the same side (Figure 8). An assistant may carefully grasp the patient along the dorsal midline and lift and jiggle to assist the surgeon in visualizing the ovary or suspensory ligament. Avoid grasping the ovary to prevent ovarian rupture and seeding the abdomen with ovarian tissue. If you cannot locate the ovary but only see what appears to be the ovarian suspensory ligament, your patient may have already been spayed. Grasp the ligament and lift it to follow it caudally to where the ovary should be. If you still cannot locate it, direct the laparoscope caudally toward the pelvic canal. If the animal is intact or has had an ovariectomy, you should see the uterine bifurcation lying on top of, or ventral to, the colon and the uterine body dorsal to the bladder.12

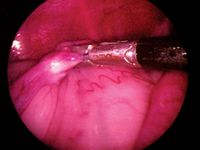
Figure 8
The ideal ovarian tacking position is generally halfway between the portals and far enough laterally to allow easy application of your endoscopic instruments and avoid interference between the cannulas and the instruments. Once the ideal tacking position is determined, remove your hand from the endoscopic Babcock forceps, and move the laparoscope (with its light source) toward the tacking spot to allow transillumination (turn off the room lights) (Figure 9). Use a large needle holder to carefully pass the swaged needle straight into the abdomen at the intended tacking spot from lateral to medial under direct observation (Figure 10). Alternatively, use a Tankersley ovariectomy hook (Karl Storz) or a large cruciate needle in place of the swaged needle, armed with No. 2 nylon suture. In cats and smaller dogs, use a regular suture needle and material. Retract the laparoscope a short distance to avoid damaging it with the needle and avoid inadvertent organ puncture.

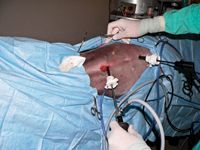
Figure 9
Then have an assistant use a sterile towel or paper drape square as a barrier to hold the camera in the selected position, keeping the needle centered in the monitor's screen. Carefully slide your left hand over to grasp the needle holder from your right hand. Regrasp the endoscopic grabbers with your right hand, carefully penetrate the mesovarium under and next to the ovary with the needle, and tilt the needle up to prevent the ovary from slipping off. Avoid passing the needle directly into the ovarian tissue since this can lead to ovarian tissue seeding and ovarian remnant syndrome.13 Because of the needle's large size, you may want to withdraw it partially as you keep the point close to the abdominal wall and then force the point through the abdominal wall.


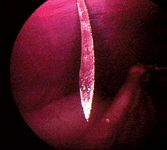
Figure 10
Once the mesovarium is on the needle, remove your hand from the endoscopic forceps. Take the needle holder with your right hand and use the widely spread fingers of your left hand to help pass the needle point back out through the abdominal wall. Carefully unclick the forceps, and remove them from the ovarian suspensory ligament to prevent incorporating them in the ligature. Then use a double throw in the suture, and draw the ovary up snuggly against the body wall and remove all slack from the suture. Do not tie a knot, but grasp the suture material securely with the needle holder next to your double throw to temporarily tack the ovary to the abdominal wall (Figure 11). Remove the endoscopic graspers from the portal.


Figure 11
Step 10: Remove the right ovary
Before you remove the ovary, keep in mind that to ensure hemostasis, you will use the LigaSure to create coagulation or a seal and will press the blade cutting button only after the LigaSure unit's energy cycle signal tone has ended. Always try to grasp the same amount (depth) of tissue each time you go through the sequence. To prevent sticking, periodically use saline-moistened gauze to wipe off any eschar from the instrument's jaws and to clean off the end of the laparoscope.
The LigaSure has a six-bar, or power level, graph display; I use three bars for large dogs, two bars for medium dogs, and one bar for cats and small dogs. Pass the LigaSure through the cranial portal, and direct it toward the tacked ovary. The LigaSure shaft can be rotated in either direction, and the bezel helps facilitate instrument placement on the tissue to be coagulated and cut. Remove only a small amount of tissue on either side of the ovary to speed up the procedure and facilitate tissue removal through the portal. Use the LigaSure as close to the abdominal wall as safely possible.
Place the laparoscope in your caudal hand and the LigaSure in your cranial hand, and gently grasp the ovarian suspensory ligament one instrument jaw width away from the ovary. Close the LigaSure on the ligament by squeezing the front hand grip toward the handle until it clicks and locks, and push the power button until the tone stops (Figure 12). Then advance the cutting blade by pulling the lever on the front of the hand piece. The tissue on both sides of the instrument jaws turns white and steam is generated. Release the LigaSure grip by squeezing the handle again and opening the jaws. Carefully move the instrument toward the ovary so that its next position overlaps that of the first. Activate the power again, and when the tone stops, advance the cutting blade by pressing the button on the front of the instrument handle. Again, gently open the LigaSure jaws and release.
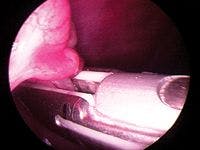
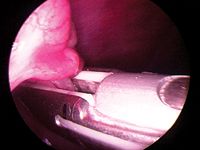
Figure 12
Continue this sequential technique until the entire ovarian suspensory ligament and the blood supply to the ovary have been carefully coagulated and cut. Then direct the LigaSure to the ovariouterine juncture and, using the same technique, sever the ovary from the uterus. Again, by applying gentle traction on the LigaSure, you ensure that you will not damage the body wall.
Once the ovary has been cut free, immediately check the remaining tissue bed (ovarian pedicles) for bleeding. Bleeding is rare, but if any is found, grasp the bleeder with the tip of the LigaSure, and then with only one bar on the power setting, seal the vessel. Alternatively, an endoscopic blunt probe (or the tip of the LigaSure) can be used to apply gentle pressure to the bleeding area. If this fails, you can use an absorbable gelatin compressed sponge (Gelfoam—Pfizer) or 10-mm Autosuture clips. If you think you have major uncontrolled bleeding, immediately convert to an open procedure.
Next, replace the LigaSure with the endoscopic forceps in the cranial portal, and grasp and click on the tag of suspensory ligament or the tag of ovariouterine juncture tissue that attaches to either side of the ovary (Figure 13). Once you have it, release the needle holding the tacking suture (remove it), and bring the ovary to the operative/cranial portal. It may be necessary to slightly enlarge the portal opening to allow the ovary to be removed. Removing the ovary and the cannula at the same time may be easier (Figure 14). A hemostat may be used to grasp the ovarian tissue as it exits the body wall to prevent losing it. Often, the ovarian tissue, if small enough, can be carefully pulled into the cannula by its tissue tag.

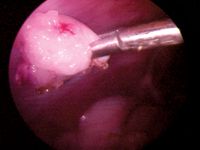
Figure 13
If using a Versaport with the Versaseal feature, carefully unscrew the Versaseal portion by rotating it counterclockwise as you hold the cannula in your opposite hand. Then you may remove the endoscopic forceps, ovary, and Versaseal in one move and replace the Versaseal without losing the pneumoperitoneum. If you removed the cranial cannula, replace it, and reestablish pneumoperitoneum. You may need to place an Allis tissue forceps next to the portal to assist in resealing the portal if you had to enlarge the opening to remove the ovary.
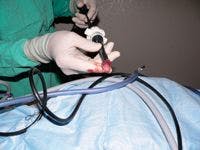

Figure 14
Step 11: Find, tack, and remove the left ovary
Step around the table, and have an assistant change the patient positioner so you may use the same technique to remove the left ovary. The landmarks are the stomach, spleen, kidney, and ovarian suspensory ligament. Often, the left ovary lies just beneath the spleen's lateral edge. If this is the case, gently pass your closed endoscopic forceps between the spleen and abdominal wall to move the spleen medially to allow you to visualize the ovary. Remember to check for any bleeding before removing the LigaSure. And always check the tissue you have removed to ensure complete ovarian tissue removal (Figure 15).
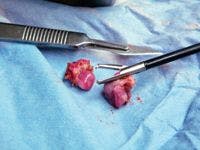
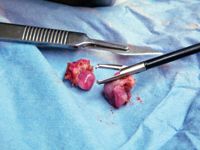
Figure 15
Step 12: Close the incisions
Finally, deflate the abdomen, remove both cannulas, and close the two portal entry points. Use absorbable Monocryl (Ethicon) or similar suture (e.g. polydioxanone, Maxon [Covidien], Dexon [Covidien])—2-0 for medium to large dogs and 3-0 for cats and smaller dogs—to close the linea alba deeply in either a simple interrupted or cruciate pattern. Additionally, place one or two skin sutures or staples per portal. I also seal the skin with tissue glue.
LAPAROSCOPIC-ASSISTED OVARIOHYSTERECTOMY: AN OVERVIEW
If uterine disease was found during the initial part of the procedure, you must either remove the entire uterus through a third portal placed just cranial to the pelvic brim (laparoscopic-assisted ovariohysterectomy2 or complete laparoscopic ovariohysterectomy) or convert to an open procedure. To perform a laparoscopic-assisted ovariohysterectomy, the third cannula-trocar unit should be 5 mm in cats or small dogs and 10 to 14 mm in medium and large dogs.
Proceed as described earlier to coagulate and cut through the ovarian suspensory ligaments and mesovarium, but do not sever the ovaries from the uterus. Avoid the uterine arteries and veins and be careful to avoid the ureters since they course close to the bladder in this area. After both ovaries have been coagulated and cut, use the endoscopic Babcock forceps to pull one ovary along with its horn through the newly added, most caudal third portal. Once the uterine bifurcation has been reached, remove the other horn and ovary by simply using outside traction. Then perform an extracorporeal ligation or LigaSure seal and cut of the uterine arteries, veins, and body at the area between the bifurcation and the cervix. When using the LigaSure extracorporeally, place a clamp below the LigaSure to prevent the uterine stump from retracting, and perform the seal and cut distal to the clamp. Replace the uterine stump, and close this portal in the same way the other portals were closed.
POSTOVARIECTOMY MANAGEMENT
Give owners routine written discharge instructions as for an open spay, but advise them in writing that because the uterus is still intact, no progestational hormones (e.g. megestrol acetate) or estrogens should ever be used in the patient as this could increase the risk of pyometra or induce signs of estrus. Instruct owners to return in 10 to 14 days for a recheck and suture or staple removal and to return sooner if any problems are encountered. Also dispense a postoperative analgesic for three days. As with traditional ovariohysterectomy, potential postoperative complications include infection, dehiscence, and herniation at the portal sites.
CONCLUSION
Two-portal laparoscopic ovariectomy provides a viable alternative to conventional ovariohysterectomy and can be performed by most practitioners already performing rigid endoscopy. It not only sterilizes bitches or queens, but it does so less invasively and helps to minimize postoperative pain. The disadvantages are the initial cost of the equipment and the time and training involved to acquire the needed skills. Once a veterinarian is trained, this procedure can be performed in 30 to 60 minutes, depending on the case and the surgeon's skill. Equipment setup and patient preparation require more time than with a conventional ovariohysterectomy.
Tom McCabe, DVM
Northeast Veterinary Clinic
9405 Dyer St.
El Paso, TX 79924
REFERENCES
1. Van Goethem B, Schaefers-Okkens A, Kirpensteijn J. Making a rational choice between ovariectomy and ovariohysterectomy in the dog: a discussion of the benefits of either technique. Vet Surg 2006;35(2):136-143.
2. Devitt CM, Cox RE, Hailey JJ. Duration, complications, stress, and pain of open ovariohysterectomy versus a simple method of laparoscopic-assisted ovariohysterectomy in dogs. J Am Vet Med Assoc 2005;227(6):921-927.
3. Tankersley T, Hampden Family Pet Hospital, Englewood, Colo: Personal communication, 2006.
4. Ternamian A. Recent advances in endoscopic entry techniques. Rev Gynecol Pract 2001;1(2):60-69.
5. Vilos GA, Ternamian A, Dempster J, et al. Laparoscopic entry: a review of techniques, technologies, and complications. J Obstet Gynaecol Can 2007;29(5):433-465.
6. Van Nimwegen SA, Van Swol CF, Kirpensteijn J. Neodymium:yttrium aluminum garnet surgical laser versus bipolar electrocoagulation for laparoscopic ovariectomy in dogs. Vet Surg 2005;34(4):353-357.
7. Austin B, Lanz OI, Hamilton SM, et al. Laparoscopic ovariohysterectomy in nine dogs. J Am Anim Hosp Assoc 2003;39(4):391-396.
8. Bailey JE, Pablo LS. Anesthetic and physiologic considerations for veterinary endosurgery. In: Freeman LJ, ed. Veterinary endosurgery. St Louis, Mo: Mosby, 1999;24-43.
9. Gower S, Mayhew P. Canine laparoscopic and laparoscopic-assisted ovariohysterectomy and ovariectomy. Compend Contin Educ Pract Vet 2008;30(8):430-440.
10. Richter KP. Laparoscopy in dogs and cats. Vet Clin North Am Small Anim Pract 2001;31(4):707-727.
11. Rawlings C, Department of Small Animal Medicine, College of Veterinary Medicine, University of Georgia, Athens, Ga: Personal communication, 2004.
12. Twedt DC, Monnet E. Laparoscopy: technique and clinical experience. In: McCarthy TC, ed. Veterinary endoscopy for the small animal practitioner. Philadelphia, Pa: W.B. Saunders, 2004;357-385.
13. Root Kustritz MV. Ovarian remnant syndrome in cats. In: Bonagura JD, Twedt DC, eds. Kirk's current veterinary therapy XIV small animal practice. Philadelphia, Pa: W.B. Saunders Co, 2008;1040.


 in general practice")


