The nitty gritty details of collecting cytology samples in veterinary patients
Are you interested in cutaneous cytology but unsure of how best to collect samples? You're in luck! Read this practical guide and you will be swabbing ears and tail folds like a pro in no time.
Collecting debris from deep within skin folds and inside pustules is not for the weak stomached. But those of us in the veterinary profession are made of strong, gritty stock. We know that debris, which may be described as “gross” by a layperson, can provide us with valuable diagnostic information.
In fact, this information is so important that cutaneous cytology should be performed in almost all dermatology cases. Luckily for us, cytology is inexpensive, is relatively easy to perform, and, if evaluated in-house, has almost immediate results. So let's gather up our cotton-tipped applicators-and just a few more tools-and dig in.
Supplies
Most of the equipment you need to get started with cytology you probably already have (Figure 1):
- Binocular lens microscope
- Slides and cover slips
- Cotton-tipped applicators
- Syringes and needles
- Cytologic stain
- A clothespin (to keep the stain off your fingers)
- Heat source (e.g. lighter)
- Transparent acetate tape (optional)
Note about stains: For in-house cytology, I recommend Diff-Quik (Dade Behring) stain. Stains should be replaced at least every other week; we change them weekly. To reduce bacterial contamination, separate staining tubs should be used for dirty (anal gland, fecal) samples.


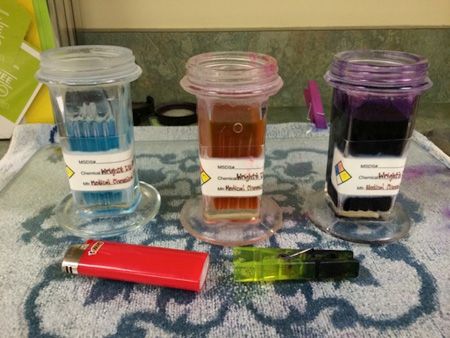
Figure 1: Some of the supplies you'll need: a lighter, a clothespin and the three parts of a Diff-Quik stain. (Photos courtesy of Dr. Melissa Hall)
How to obtain samples from …
Ears: Insert a cotton-tipped applicator into the vertical external ear canal. Then remove the applicator and roll it onto the slide. Heat fix the slide by applying flame to the back of the slide for a few seconds. Stain using the three-part Diff-Quik stain. With very waxy ears, you may need to keep the slide in the first step of the Diff-Quik (the fixative) longer.
- You don't want to damage the ear by accidentally placing the cotton-tipped applicator too far into the canal, so when inserting it, hold the applicator so that only an inch of it can be inserted (Figure 2).
- Develop a method to keep track of left ear samples vs. right ear samples and then apply it consistently. I hold the slide with my left hand, so the samples from the left ear are next to the frosted part of the slide and the samples from the right ear are on the other side. Others like to make small Ls or Rs on their slides. The method is not as important as consistency is.


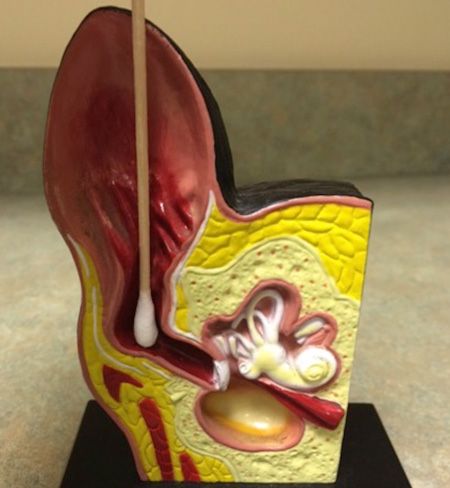
Figure 2: An anatomic model showing the correct placement of a cotton-tipped applicator in the ear canal.
Skin folds or interdigital spaces: Insert a cotton-tipped applicator into the skin fold as deeply as you can and rub it along the skin. Then roll the applicator onto the slide, heat fix the slide, and stain it.
I have found getting samples from the tail folds of English bulldogs to be helpful in determining why the dogs are scooting around on the floor. Owners often think that anal glands need to be expressed when the issue is an irritating infection.
Claw folds: Gently insert a toothpick or a broken cotton-tipped applicator into the cuticle to draw out debris, which may be dark brown, thick, and adherent, and then apply that debris to a slide (Figure 3).
- The debris might not look like much, but once you stain it, there may be a lot to see, especially yeast.
- Claw fold sampling is a good idea for dogs that are licking their paws a lot, even if the paws appear to be healthy.

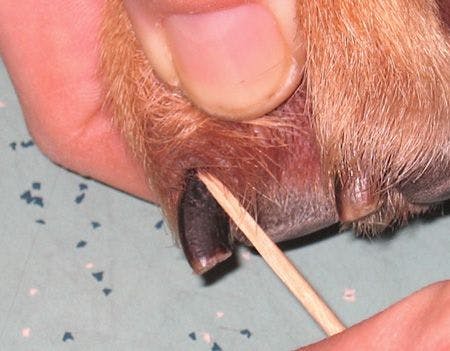
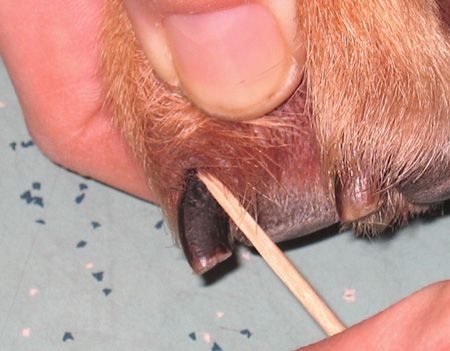
Figure 3: Obtaining a sample from a claw fold.
Moist or exudative lesions: Press the slide directly onto the lesion (Figure 4). Be careful not to rub the slide or move it side to side as this can disrupt the cells and make it more difficult to read. For these samples you can let them dry without heat fixing. When in a hurry, heat fixing with a lighter is also appropriate. Again, stain using the Diff-Quik system.


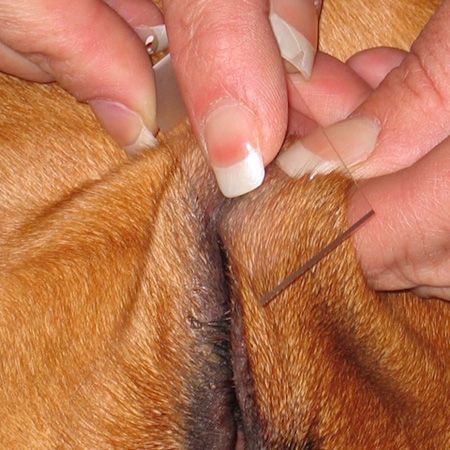
Figure 4: Pressing a slide directly on an exudative lesion.
Pustules: Open the pustule and then press the slide directly onto the fluid and pustule and smear the debris across the slide. If you need a culture sample, you can apply the cotton-tipped applicator at the same site that was prepared from the slide. Ideally, these slides are allowed to air dry to minimize trauma to the cells. To speed the process along, you can quickly heat fix by applying flame on the back side of the slide for a few seconds. The slide is then fixed using the three-part Diff-Quik system.
Crusty lesions: Take the leading edge of the slide (frosted side facing down onto the skin) and rub it at the beginning of the crust, getting under the crust, and then continue rubbing the slide against the affected skin. By using this technique, the sample can be collected from between the crusted material and the skin surface. Follow by heat fixing the slide using a lighter and stain with the Diff-Quik.
Dry or scaly lesions: Press the sticky side of clear acetate tape firmly against the lesion. Stain the tape directly, skipping the fixation solution, and press the tape (sticky side down) onto a slide.
- Acetate tape gets everything on the skin-it goes deeper than a direct smear-so samples obtained with this method can take longer to read.
- I prefer to use the sample-collecting method described above for crusty lesions instead of the acetate tape method. If you collect the sample directly on the slide (see “Crusty lesions”), be sure to heat fix the slide before staining.
Nodules or abscesses: Collect these samples through fine-needle aspiration, and then place the aspirate on a slide. If a large amount of material has been obtained, use a second slide to evenly distribute the sample (a similar technique to preparing a blood smear slide). To preserve the integrity of the cells, do not heat fix these slides. Once the slide sample is dry, stain using the three-part Diff-Quik stain.
Interpreting slides
Like most things, evaluating cytology slides is a matter of diligence and practice. If you are just starting out, I suggest studying samples from healthy animals first so you know what normal results look like. Then when making slides with patients' samples, make duplicate slides. Send one slide to a laboratory, read the other one yourself, and then compare the results. You will learn a lot, and, eventually, you may be able to evaluate the slides in-house only. Of course, you can always send slides to a laboratory if you prefer, although you lose the advantage of immediate information.