Optimize intestinal parasite detection with centrifugal fecal flotation
Failure to use best-practice techniques, such as centrifugation, when conducting fecal flotation procedures can result in failure to detect parasite stages in fecal samples. In this article, we review the basics of fecal flotation techniques and describe step-by-step procedures for conducting accurate and effective centrifugal flotation procedures.
Intestinal parasites are prevalent and important disease agents in companion animals and are potential causes of zoonotic disease in pet owners.1,2 These parasites can be detected by examining fecal samples with direct smear, sedimentation, flotation, and fecal ELISA techniques. Fecal flotation is the procedure used most commonly in veterinary practice. However, failure to use best-practice techniques, such as centrifugation, when conducting fecal flotation procedures can result in failure to detect parasite stages in fecal samples.2-4 In this article, we review the basics of fecal flotation techniques and describe step-by-step procedures for conducting accurate and effective centrifugal flotation procedures.


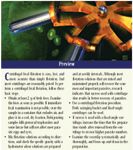
Preview
HOW FLOTATION WORKS
Fecal flotation procedures are used to separate parasites in all life stages (e.g. eggs, oocysts, sporocysts, cysts, larvae) from other objects and debris based on their different densities. Density is the weight of a parasite or other object per unit volume. It is usually expressed as specific gravity, which is the ratio of a parasite's density to the density of water (the density of tap water is 1.0). A parasite with a density of 1.10 is 1.10 times denser than tap water.

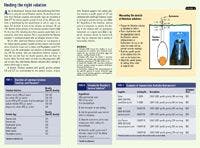
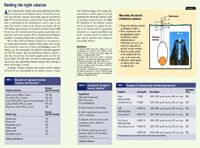
Finding the right solution
Successful fecal flotation is based on the principle that when a fecal sample is placed in a sugar or salt solution, parasites (and other objects) less dense than the flotation solution will move to the top of the solution and parasites more dense than the solution will eventually settle to the bottom. Buoyancy, the upward force a solution exerts on an object with less density than the solution, forces parasites with less density upward, while gravity and the viscosity (thickness) of the solution retard upward movement. If the buoyant force exceeds the forces of gravity and viscosity, the parasites eventually move to the surface (see the boxed text titled "Finding the right solution").
WHY CHOOSE CENTRIFUGAL FECAL FLOTATION?
Centrifugation forces the heavier objects to the bottom of the container sooner than the force of gravity alone does. Removing larger, heavier debris from the surface of the preparation will aid in the flotation of parasites and prevent the debris from obscuring your view of them. Also, in viscous solutions such as sugar, the downward force created by centrifugation is more likely to overcome the force of viscosity and lead to greater parasite recovery.
Therefore, successful recovery of parasites depends on a parasite's density and the density and viscosity of the flotation solution and how these factors interact and affect the time it takes for a parasite to float to the solution's surface. All these factors determine how long we centrifuge the samples or allow flotation preparations to stand before we examine the coverslip for parasites.
Veterinarians or veterinary technicians are sometimes reluctant to perform centrifugal fecal flotation procedures. Here are some myths about fecal flotation:
1. "Centrifugation is no more accurate than simple flotation." Research has confirmed that centrifugal flotation is more effective than simple flotation in recovering parasites from fecal samples.2-4 The reason is simple: The buoyant and centrifugal forces that we can apply to the solution containing the parasites when we spin the tubes in the centrifuge are much greater than the forces of buoyancy and gravity that we use to concentrate parasites during simple flotation. Recovery rates were particularly improved for heavier eggs such as Trichuris vulpis (whipworms) and Taenia species (tapeworms) as well as for Toxocara species (roundworms), Eucoleus (Capillaria) species (roundworms), and Isospora (coccidia) species when centrifugal flotation was used.2-4 Given that well-cared-for pets are more likely to harbor a lower burden of parasites, it is important to use centrifugation to increase parasite recovery rates.3
2. "Centrifugation is too complex and requires too much time." Centrifugation is easy and fast.
3. "A centrifuge is too large and occupies too much valuable counter space in busy veterinary practices." Swinging bucket and fixed-angle centrifuges require little hospital bench space. Many are less than 16 in long.
4. "The cost of a centrifuge is prohibitory for many practitioners." Most centrifuges are reasonably priced and can be used for decades with minimal service and often little or no repair (see Tables 1 & 2).
5. "Centrifuge rotors allow a limited number of samples per centrifuge run." A variety of rotors are available to suit the needs of the busiest of practices.
COLLECTING AND STORING SAMPLES
The accuracy of any fecal examination procedure depends on the amount and quality of the fecal sample. We recommend using at least 2 g of feces for fecal flotation; 2 g of firm, normal feces will form a cube about 0.5 to 0.75 in on a side. Occasionally it is necessary to use a sample obtained with a fecal loop or a rectal thermometer. In these cases, a negative result is meaningless, but a positive result can imply a high level of parasitism. Increase the sample size as the amount of water in the sample increases. Contrary to what you might think, diarrheic fecal samples from animals with a large burden of parasites may contain relatively few fecal parasite stages because of the dilution effect of the increased water content.


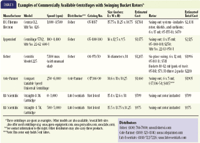
Table 1 Examples of Commercially Available Centrifuges with Swinging Bucket Rotors*
Advise clients that they should collect and store feces in a container that will exclude air. A plastic bag or container with a lid will suffice. Samples should be stored in a cool, dry location out of direct sunlight. Storage in a standard refrigerator is ideal, although most pet owners are reluctant to place samples in a refrigerator with food. Samples can be refrigerated for several days to a week without affecting most parasites; however, samples should always be delivered to the veterinarian and examined as soon as possible. Trophozoites of Giardia and Tritrichomonas species and certain nematode larvae will not survive storage. When these parasites are suspected, the sample must be examined immediately.


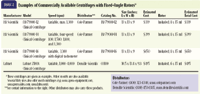
Table 2 Examples of Commercially Available Centrifuges with Fixed-Angle Rotors*
PREPARING SAMPLES
In preparing fecal samples for centrifugation, eliminate as much large debris as possible (see an overview of sample preparation in Figure 1). First, add the fecal sample (Figure 2) to an amount of flotation solution that will fill the tube into which the mixture will be poured to about 80% of its capacity. Stir the mixture to distribute the fecal material throughout the flotation solution. If sucrose is used, take care not to stir the mixture too vigorously to avoid creating air bubbles. Then pour the mixture through a strainer into another clean container (Figure 3) and into a test tube (Figure 4), or pour the mixture through one or two layers of gauze sponge into another clean container or directly into a test tube. The filtrate is ready for centrifugation.


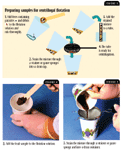
Figures 1,2,3
CONDUCTING CENTRIFUGAL FLOTATION
Centrifugal flotation can be performed by using either a swinging bucket or fixed-angle centrifuge. We prefer a swinging bucket centrifuge because it decreases the number of times the sample must be handled.
Swinging bucket centrifuge
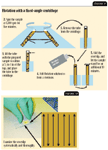
For an overview of the swinging bucket centrifuge technique, see Figure 5. Place the prepared sample into a tube holder (bucket) in the centrifuge (Figure 6). Add flotation solution (Figure 7) to form a rounded meniscus at the top of the tube. Gently place a coverslip on the tube (Figure 8). It is important to avoid trapping air bubbles under the slide. This can be prevented by placing one side of the coverslip in contact with the tube and then slowly lowering the coverslip by gradually reducing its angle over the meniscus of the sample.
The next step is the most important when using a swinging bucket centrifuge: Gradually increase the speed of the rotor to a maximum of 800 rpm. This gradual increase is only possible if the centrifuge is equipped with a dial, a knob, or a digital entry button that allows you to increase the speed incrementally. If the rotor speed is increased gradually to the target speed, the centrifuge bucket will move slowly to a horizontal position and the coverslip will remain in place. If the rotor speed is increased too rapidly, the coverslip may be dislodged from the sample tube. (Never operate the centrifuge with the lid open.) Often the lowest rpm setting allows the buckets to swing outward. If the coverslip will not stay in place at the lowest rpm, use the method suggested for the fixed-angle centrifuge (Figure 9). Also follow the instructions for the fixed-angle centrifuge if the centrifuge does not have variable speeds or if the initial speed is too fast.


Figures 4,5,6,7,8
After the required centrifuge time of 10 minutes, turn off the centrifuge, and allow the rotor to come to a complete stop. Do not touch the rotor or use the centrifuge brake to slow it. Remove the coverslip from the sample tube in one deliberate upward motion, and place it on a microscope slide. Place one side of the coverslip on the slide first and lower it gradually at an angle onto the glass slide as described previously to prevent entrapped air bubbles.
We are often asked whether to allow the sample to stand an additional five or 10 minutes after centrifugation. Although data suggest that an additional 10-minute standing time may increase parasite recovery rates,2 we suggest that if extra time is added to the procedure, the time should be added to the duration of centrifugation.
Fixed-angle centrifuge
Centrifugal flotation with a fixed-angle centrifuge requires minor procedure changes from those used with a swinging bucket centrifuge (see an overview of the fixed-angle technique in Figure 9). Because the sample is placed in the centrifuge at an angle, it is not possible to form a meniscus at the top of the sample tube or to place a coverslip on the tube. Also, since the tube is not topped with a coverslip, the final speed at which the sample is centrifuged is not as important, nor is it necessary to start the centrifuge at a slower speed. Centrifuge the sample at about 1,200 rpm for five minutes. Faster centrifuge rates can be used without adversely affecting the result. We do not suggest reducing the centrifuge time to less than five minutes.


Figures 9,10
Allow the centrifuge to stop as described above. Remove the centrifuge tube, place it in a holder, and add flotation solution to form a meniscus. Follow the same procedure for placing a coverslip as described previously. Allow the sample to stand for a minimum of 10 minutes before removing the coverslip, placing it on a slide, and examining it for parasite stages. If a sucrose flotation solution is used, we have found that it may be necessary to allow the tube and coverslip to stand for 15 to 20 minutes to recover all of the parasites stages. In my clinical experience, it is not necessary to wait longer than 10 minutes when all other flotation solutions are used.
MICROSCOPIC EXAMINATION
Examine the coverslip on the slide systematically and thoroughly. A prepared fecal slide is three-dimensional—it has length, width, and depth. Depth is the most important. It is helpful to focus on the dust on the top of the coverslip and then move downward. The smaller parasites (e.g. Giardia species, Cryptosporidium species, small coccidia) will be found in the first or top-most layer. The next layer down will contain the large eggs (roundworms, hookworms, whipworms), oocysts, and larvae (if present).
To examine the coverslip, start at one corner and move systematically through the sample (Figure 10). Focus up and down as you move through the sample, unless you suspect a parasite of particular size. If this is the case, you may concentrate your efforts at the layer in which that parasite is found. Examine the entire coverslip with the 10× objective lens (total magnification 100×). Small parasites or other objects should then be examined with the 40× objective lens (total magnification 400×). Do not use the 100× (oil immersion) objective lens to examine fecal flotation slides. Some laboratories will spot-check five to 10 fields in the center of the slide using 400× magnification to ensure that very small parasites are not overlooked. This certainly is a viable option, although we do not recommend it as a routine procedure in the clinic since questionable small objects will be examined at a higher magnification anyway.
Byron L. Blagburn, MS, PhD
Jamie M. Butler, BS
Department of Pathobiology
College of Veterinary Medicine
Auburn University
Auburn, AL 36849-5519
REFERENCES
1. Blagburn BL, Lindsay DS, Vaughan JL, et al. Prevalence of canine parasites based on fecal flotation. Compend Contin Educ Pract Vet 1996;18:483-509.
2. Dryden MW, Payne PA, Ridley R, et al. Comparison of common fecal flotation techniques for the recovery of parasite eggs and oocysts. Vet Ther 2005;6:15-28.
3. Dryden MW, Payne PA, Smith V. Accurate diagnosis of Giardia spp and proper fecal examination procedures. Vet Ther 2006;7:4-14.
4. Payne PA, Dryden MW. Accurate evaluation of fecal samples critical to patient. DVM Best Practices 2003;Mar:8-11.