Skills Laboratory: Wound repair techniques-Pinch/punch grafts
When surrounding tissue can't cover a defect, consider using these grafts for wound closure.
Next >
Pinch/punch skin grafting is a simple procedure that requires no special instrumentation. The grafts, circular pieces of skin 4 to 6 mm in diameter, are placed in pockets cut in a granulation tissue wound bed. Pinch/punch grafts can be used to repair wounds in which local flaps or other methods for moving local tissue into a defect cannot be used for wound closure.
Bandaging and immobilization are important requirements for skin grafts to heal. Because pinch/punch grafts are placed in pockets, these grafts lend themselves well for use on wounds in areas that are difficult to bandage or immobilize, since the pockets serve as a biologic bandage (Figures 1A-1C).


Figure 1A: A facial wound over the nasal area with granulation tissue covering the nasal bones.


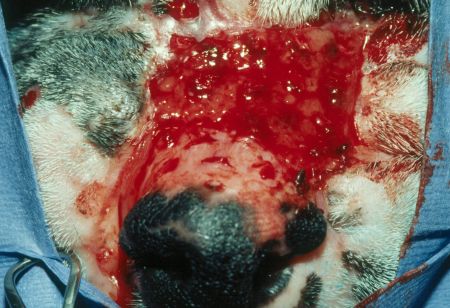
Figure 1B: Punch grafts have been placed in granulation tissue pockets.


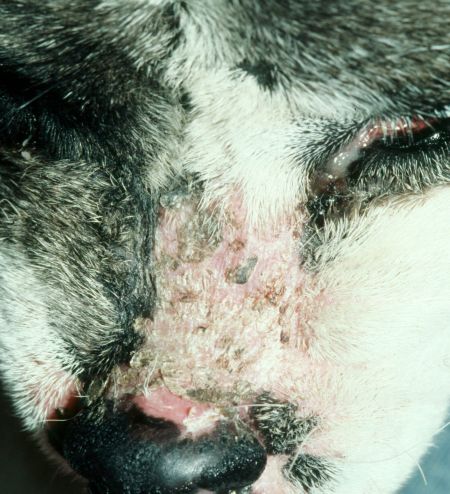
Figure 1C: The healed wound.
PREOPERATIVE WOUND TREATMENT
Pinch/punch grafting is a delayed grafting procedure, requiring that the wound be treated as an open wound until a healthy bed of granulation tissue is present. Ten to 14 days of open wound management is usually required. In the period before grafting, simultaneously débride and lavage the wound daily with either physiologic saline solution or a 1:40 dilution of 2% chlorhexidine diacetate or gluconate in sterile water. It is important that a chlorhexidine solution be used and not a scrub. Remove nonviable tissue, which is white, dark, or unattached and has no blood supply. Leave tissue with questionable viability in situ, and reevaluate it the next day.
Topical antibacterial medications are not always indicated, but if needed apply topical antibacterials, such as silver sulfadiazine or nitrofurazone, to the wound. Although some topical medications can have a negative effect on certain stages of wound healing (e.g. nitrofurazone's adverse effect on epithelialization) the main concern at this point is controlling infection, since active infection will jeopardize the survival of the grafts. In addition to topical antibiotics, in some cases systemic antibiotics may also be indicated to treat infected wounds.
Additionally, wound-healing stimulants may be applied topically. These stimulants promote healing, including the early appearance of granulation tissue. Wound-healing stimulants that promote granulation tissue formation include an acemannan-containing gel (CarraVet Acemannan Wound Gel-CarraVet), a maltodextrin NF D-glucose polysaccharide (Intracell-Macleod Pharmaceuticals), and a tripeptide copper complex (Iamin Hydrating Gel Wound Dressing-Folica).
Treat the wound until a healthy bed of granulation tissue is present over the entire wound. Epithelium starting to grow from the wound's edge over the granulation tissue is an indication the wound is healthy enough for pinch/punch grafts. But keep in mind that epithelium can start growing over granulation tissue at the wound's edge before the wound's center is covered by granulation tissue, so make sure that the entire wound surface is covered by granulation tissue. (This article's procedural photos are of a canine specimen, so no bed of granulation tissue is present. However, during the procedure the muscle tissue of the forelimb responded in a way similar to granulation tissue.)
ADVANTAGES AND DISADVANTAGES
Pinch/punch grafting has a number of important advantages over other skin resurfacing procedures:
- No special equipment is needed, and the procedure is easily accomplished.
- Since the grafts are placed in granulation tissue pockets, vessels grow into the grafts, and fibrin and then collagen secure the grafts in place. As the grafts heal, the overlying granulation tissue of the pocket regresses. After the grafts are healed in place, epithelium grows from the edges of each graft to cover the intervening granulation tissue. In addition, wound contraction merges the grafts (Figure 2).
- Hair grows on the grafts to help give a cosmetic appearance to the grafted area.
- Pinch/punch grafts lend themselves well to highly contoured areas where it can be difficult to keep a mesh graft in contact with the wound bed.
- A large donor site is not needed. Pinch/punch grafts can be harvested from multiple small donor sites.
There are a couple of disadvantages to this form of skin grafting:
- With pinch/punch grafts, the final hair coat on the grafted area is rather sparse. This is because only the original pinch/punch contains hair follicles and the rest of the wound area is covered by only new epithelium. Moreover, the new epithelium that covers the area between grafts will not be as thick or durable as the original skin. This disadvantage is likely to be important only when the initial defect is very large and located in an area subject to continual risk of trauma (e.g. a large distal limb wound in a hunting dog).
- It is difficult to maintain hair growth in one direction when placing the grafts.

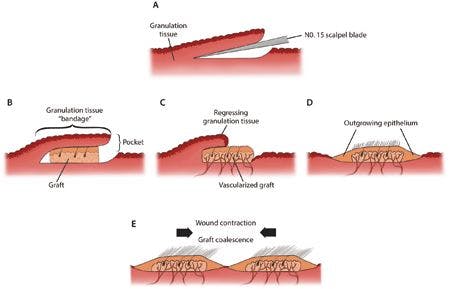

Figure 2: A cross section showing the healing process of a punch graft placed in a pocket. A No. 15 scalpel blade creates a granulation tissue pocket (A). A graft is placed in a granulation tissue pocket, with the pocket serving as a local “bandage” (B). Healing of the graft: regression of the granulation tissue pocket and vascularization of the graft (C). Epithelial outgrowth from the graft (D). Wound contraction merges the grafts (E). (Illustration by Kip Carter.)
HOW TO PLACE PINCH/PUNCH SKIN GRAFTS
After induction and maintenance of general anesthesia, position the patient so that both the wound to be grafted and the donor area are accessible. If the wound and donor site are adjacent, these areas can sometimes be draped together. However, the cranial, lower lateral thoracic area is commonly selected as a donor site. Skin in this area is thin, which is an advantage in revascularization of the graft, and yet is well-haired. Skin can be harvested from other sites if necessary.
Prepare these two areas for aseptic surgery. Place a sterile lubricant (Surgilube–Savage Laboratories) and a protective gauze over the wound (the recipient site) to protect it from hair clippings and preparation solutions. Prepare a wide enough section of the skin on the thoracic area (the donor site) so that unprepared skin is not pulled from under the surgical drapes if graft site excision and closure are chosen as the means of graft donor site healing. Drape the wound and the thoracic area separately.
Step 1
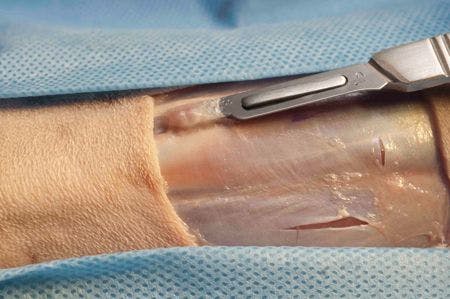
At the recipient site, use a No. 15 scalpel blade to make a pocket in the granulation tissue. Start the procedure at the bottom of the wound and progress to the top, depending on the orientation of the wound relative to gravity. By doing this, blood runs down over the area you have already grafted. Whereas, if the procedure was started at the top of the wound, blood would run down over the area where you need to be working next.
Insert the scalpel blade into the granulation tissue almost parallel to the wound surface; however, angle the blade slightly, about 15 to 20 degrees, downward. The opening of the pocket that is created is dorsal. Create a pocket about 4 to 5 mm deep (see photo). As you progress, the incisions should be about 5 to 7 mm apart. Hemostasis is attained by applying pressure over the wound for three to five minutes.


Step 2
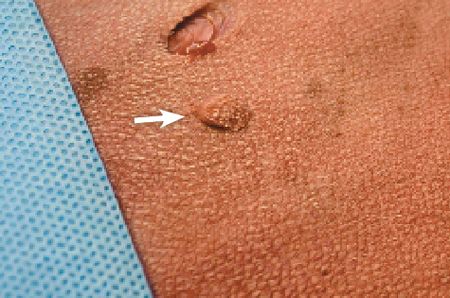
At the donor site, use a 4-mm diameter skin biopsy punch to harvest a punch graft. Direct the biopsy punch at an angle to match the angle of the hair growth in the area (see photo; arrow indicates the direction of hair growth). Doing so will incorporate a maximum number of intact hair follicles into the graft, helping provide better hair regrowth in the grafted area and a better cosmetic appearance.


Step 2 cont'd
After cutting through the full thickness of the skin, use thumb forceps and scissors to snip underlying connective tissue and remove the graft (see photo; arrow).


For an alternative method for harvesting grafts (the pinch method), see the sidebar on page 13.
Step 3
At the donor site, use scissors to snip off any subcutaneous tissue adhered to the dermis (see photo). Snipping off the subcutaneous tissue helps ensure that the graft is composed of only dermis and epidermis. Any subcutaneous tissue, fascia, fat, or cutaneous trunci muscle adhered to the graft could impede the ingrowth of new vessels into the graft.


Step 4
The graft (see photo) is now ready to insert (arrow) into the pocket (broken line). Insert the graft with thumb forceps, keeping the direction of hair growth on the graft similar to that of the surrounding area. When placing grafts in the pockets, choose one of two techniques to ensure there is a graft in each pocket:
- Make a pocket, harvest a graft, place the graft in the pocket, and then repeat the procedure.
- Estimate the number of grafts needed, harvest the grafts, and place them in a saline-moistened sponge. Then, as each pocket is made, place a graft in it.
The point is, do not make all the pockets first and then try to keep track of which pocket has a graft in it and which one does not.


Step 4 cont'd
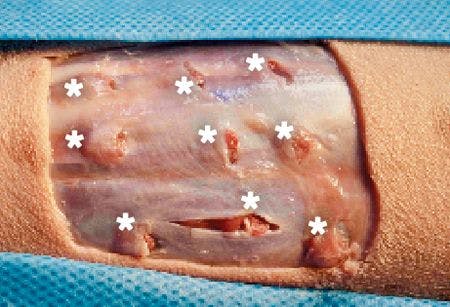
The result of either technique is a punch graft placed in each pocket (see photo). Usually, there is a slight bulge to the pocket, indicating the presence of a graft (asterisks).


For an alternative method to prepare the recipient site and place grafts, see the sidebar on page 13.
Step 5
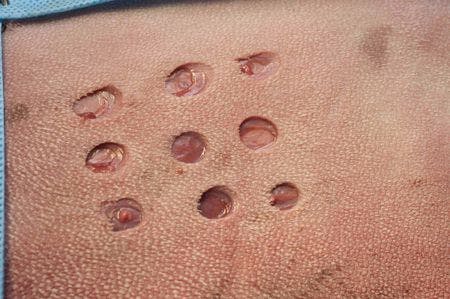
The donor site now consists of a series of full-thickness circular skin defects (see photo).

Step 5 cont'd
Place a simple interrupted suture of 3-0 monofilament nylon or polypropylene in each defect.


Alternative techniques for managing the donor sites are 1) to excise the entire donor area and close it using undermining and walking sutures (see “Skills Laboratory: Walking sutures,” Veterinary Medicine, April 2010,dvm360.com/WalkingSutures) or 2) to let the circular defects heal as open wounds by second intention healing and periodic bandage changes. Because of its simplicity, I prefer closure of the individual donor sites with sutures.
SIDEBAR: Alternative techniques for grafting
Following are two alternative methods that can be used for grafting.
Harvesting grafts: The pinch method
Another method for harvesting grafts is a tenting technique. At the donor area, the point of a curved suture needle in needle holders is used to elevate (tent) the skin. A No. 15 scalpel blade is then used to cut the tip off the tented skin. This tends to create a split-thickness pinch graft that is thickest (more dermis) at its center (Figure A). If cut thick enough, the graft could be full-thickness in its center. These grafts can be placed in either a pocket or a cylindrical hole. When the grafts heal, they may not have as good a hair growth as grafts cut with a biopsy punch since they tend to be split thickness.


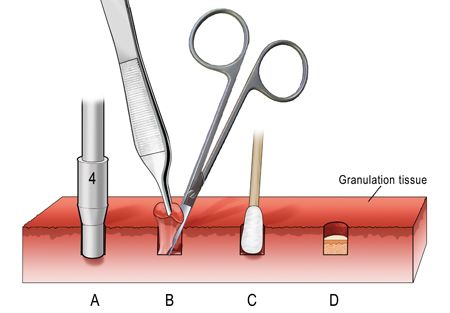
Figure A: Harvesting pinch grafts with the tenting technique. The point of a curved suture needle elevates, or tents, the skin, and a No. 15 scalpel blade is used to cut the tip off the tent to provide a pinch graft. The graft tends to be a split-thickness graft, meaning it is thickest in its center. (Illustration by Kip Carter.)
Using a biopsy punch to prepare the recipient site
Another way to prepare the graft bed is to use a skin biopsy punch to create the series of holes in the granulation tissue into which the grafts are placed. If a 6-mm diameter biopsy punch is used to harvest the grafts, a 4-mm diameter biopsy punch is used to make cylindrical holes in the granulation tissue bed. The punch is directed perpendicular to the wound's surface to cut a cylindrical piece of granulation tissue (Figure B). The base of the cylinder is cut loose with a small pair of scissors (e.g. iris scissors). After the cylinder of granulation tissue is removed, hemostasis can be attained by placing a cotton-tipped applicator in the hole for about five minutes. The hole's edges will retract some, making the hole slightly larger. Thus, a 6-mm diameter graft fits nicely into the hole. When the graft is placed in the hole, it should fit down in the hole such that its epidermal surface is beneath the level of the granulation tissue. With this technique, there is more indication for bandaging to protect the graft in the hole. Because the graft lies below the surface of the granulation tissue, the primary bandage layer is less likely to stick to the graft's surface and be disturbed in its bed at bandage changing. However, that potential does exist. In my opinion, there is less danger of this problem if the graft is covered by a pocket as described in this article.

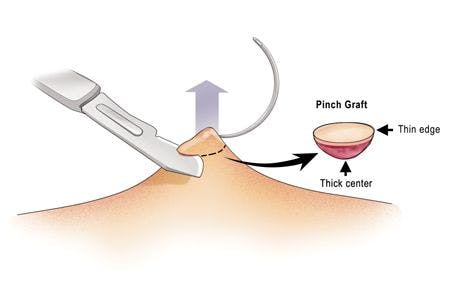

Figure B: Placing a punch graft in a cylindrical hole in granulation tissue. A 4-mm diameter biopsy punch cuts a cylindrical granulation tissue segment (A). Cutting the base of the cylindrical segment with small scissors (B). A cotton-tipped applicator placed in the cylindrical hole for hemostasis (C). A 6-mm diameter punch graft is placed into the cylindrical hole with its epidermal surface below the level of the granulation tissue surface (D). (Adapted from Pavletic MM: Skin grafting and reconstruction techniques. In: Bojrab MJ, ed. Current techniques in small animal surgery. 4th ed. Baltimore, Md: Williams and Wilkins, 1990; 585) (Illustration by Kip Carter.).
POSTOPERATIVE CARE
Recipient site
Since pinch/punch grafts are not fixed to the wound surface by sutures, bandaging is important in immobilizing the grafts as they heal. Pinch/punch grafts are generally not used on limb wounds. However, they could be considered for wounds over joints since movement is less disruptive to pinch/punch grafts than to a mesh graft. If pinch/punch grafts are used on limbs or over joints, incorporate a splint into the bandage, especially if the graft is in the area of a joint. Discontinue splinting 10 to 14 days after grafting when grafts are well-advanced in the healing process.
Throughout the healing process, an indication of graft healing is regression of the granulation tissue over the graft if pocket placement has been used and the growth of epithelium from the grafts over surrounding granulation tissue. These changes indicate that the grafts are viable and that the healing process is progressing. Except for granulation tissue regression, the same holds true for grafts placed in cylindrical holes (see the sidebar on page 13).
When bandaging these wounds, be careful not to disturb the grafts. Grafts placed in cylindrical holes are even more in danger of disruption during bandaging. If it is possible to bandage the grafted area, begin by placing a thin, almost imperceptible coating of 0.1% gentamicin sulfate antibiotic ointment (Perrigo) on a sterile absorbent, nonadherent primary dressing pad. The thin coating allows fluid absorption from the area and provides antibacterial protection for the grafts. Next, place an absorbent secondary wrap of open-mesh cotton gauze rolls (Kerlix-Coviden or Sof-Band Bulky Bandage-Johnson & Johnson) over the primary dressing, followed by a tertiary wrap of 2-in-wide adhesive tape or elastic tape.
Bandages are more likely to stick to the graft surface during bandage changes if the graft is not down in the hole sufficiently below the wound's surface. When the grafts are in pockets, the overlying granulation tissue protects them from sticking to the bandage. When removing a bandage, after removing the secondary bandage layer, use warmed (body temperature) sterile physiologic saline solution to wet the contact layer to help ensure its release from the graft surface.
Generally, change bandages at two- or three-day intervals when grafts are in pockets and at three- or four-day intervals when they are in holes, with the longer time allowing for better healing and fixation of the graft to the wound, especially for the first bandage change. The time between bandage changes can become longer as the grafts heal, as epithelium spreads over the wound, and as drainage decreases.
In cases in which grafts are in areas that cannot be bandaged or in which bandaging would be quite difficult (e.g. the dorsum of the nasal area or the axillary area), no bandage is used. The grafts are placed in pockets, with the overlying granulation tissue acting as the bandage. In these cases, it is imperative that the grafted area be protected from molestation by, for instance, using an Elizabethan collar. Wound discharge may desiccate over the area forming a scab. The scab also acts as a bandage and should not be disturbed, allowing the scab to slough as underlying epithelium grows from the grafts to separate the scab from the wound surface.
The grafts may be well-healed within 14 to 21 days. However, bandaging should be continued for another week or two to allow for maturation of healed tissues and wound contraction to coalesce the grafts. During this time, bandage changes are less frequent and antibiotic application may be discontinued once the area between grafts has epithelialized.
Since pinch/punch grafts lend themselves well to use on wounds in areas that are difficult to immobilize, restricted exercise is necessary during healing. For example, cage rest with leashed periodic excursions during the day for elimination is indicated. Limited exercise is especially important during the early postoperative period to allow vascular and connective tissue attachments to develop.
< Back
Donor site
If a simple interrupted suture was used to close each graft donor site, or the entire donor site was excised and closed with walking sutures, a body bandage could be used to protect the area from molestation if you think it is necessary. If the donor sites are to be allowed to heal as open wounds, then such bandaging is definitely indicated with periodic bandage changes to assess the healing process.
Bandage the donor site by placing a sterile absorbent, nonadherent primary dressing pad over the wounds if open wound healing is to be used for healing of the graft donor sites. A surgical sponge can be used to cover the donor site if suture closure has been used. Wrap the thorax with an absorbent bandage wrap from just behind the forelimbs to the level of the last rib. At the cranial edge of the bandage, crisscross two wraps over the cranial shoulder area and between the forelimbs to form straps that keep the bandage from slipping caudally.
Place a tertiary wrap of 2-in-wide adhesive tape or elastic tape over the secondary wrap. If open wound healing is used for the graft donor sites, periodic bandage changes are indicated. If the donor area has been removed and closed with sutures or individual donor sites have been closed with sutures, there will be little or no wound drainage. Thus, the bandage is left in place for seven days and removed when skin sutures are removed.
POTENTIAL COMPLICATIONS
The primary complication of this procedure is loss of some of the grafts at bandage change.
After maturation of the grafts, the surface of the grafted area may not be as durable or cosmetic as with mesh graft repair. Even with coalescence of the grafts by wound contraction, there will be more epithelial coverage of the repaired area and a less abundant hair growth than with a wound repaired with a mesh graft.
SUGGESTED READING
1. Bohling MW, Swaim SF. Skin grafts. In Tobias KM, Johnston SA, eds. Veterinary surgery: small animal. St. Louis, Mo: Elsevier/Saunders, 2012; 1271-1290.
2. Pavletic MM: Atlas of small animal reconstructive surgery. 2nd ed. Philadelphia, Pa: WB Saunders Co, 1999;275-295.


 in general practice")


