Skills Laboratory: Wound repair techniques-Strip skin grafts
A step-by-step guide to this simple way to repair wounds in which local tissue is not available for closure.
Next >
Visit dvm360.com/StripSkinGraftsto view a video of Dr. Swaim performing this technique.
Strip skin grafting is a simple wound repair procedure that requires no special instrumentation. The grafts are strips of full-thickness skin that are about 5 mm wide, placed in 2-mm-deep parallel grooves that have been incised in a granulation tissue wound bed. Strip skin grafts provide coverage for wounds in which local tissue or local flaps cannot be used for wound closure or in which excessive tension would be created by placing presutures or adjustable horizontal mattress sutures or by making multiple punctate relaxing incisions. (For more information on these wound closure techniques, go todvm360.com/WoundRepair.)
These grafts are usually placed on wounds on the mid- to lower limb areas. Wounds that run parallel to the long axis of the limb lend themselves nicely to strip grafting, although this technique can be used in wounds of any orientation.
Dogs have an abundance of thin well-haired, loose skin on the lower craniolateral thoracic area, which makes it ideal for harvesting skin grafts. There is also sufficient skin for primary closure of the defect after obtaining a graft.
Pre-graft wound treatment
Strip skin grafting is a delayed grafting technique in that the wound must be treated as an open wound until a healthy granulation tissue bed has formed. Treatment of the wound should consist of daily lavage with either physiologic saline solution or a 1:40 dilution of 2% chlorhexidine diacetate or gluconate in sterile water and staged débridement in which definitely nonviable tissue is removed. Such tissue is either white, dark, or not attached with no blood supply. Leave tissue that is of questionable viability in place, and reevaluate it the next day when lavage and débridement are repeated. Bandage the wound between treatments.
Topical antibacterial medications (e.g. silver sulfadiazine or nitrofurazone) can be applied to the wound if the surgeon thinks they are needed to control infection. However, they are not always needed or indicated. Although some topical medications can have a negative effect on certain stages of healing, such as the negative effect nitrofurazone can have on epithelialization, the primary concern at this point is controlling infection. In addition, wound-healing stimulants can be applied topically. These stimulate the repair process to include early appearance of granulation tissue. Stimulants include an acemannan-containing gel (Carravet Acemannan Wound Gel-Carravet), a maltodextrin NF D-glucose polysaccharide (Intracell-Macleod Pharmaceuticals), and a tripeptide copper complex (Iamin Hydrating Gel Wound Dressing-Folica). Systemic antibiotics may also be indicated to treat infected wounds.
Treat the wound until a bed of healthy granulation tissue is present over the entire wound. Epithelium starting to grow from the wound edge over the granulation tissue is an indication the wound is healthy enough to graft. However, it is important that the entire wound surface be covered by granulation tissue since epithelium can start growing over granulation tissue at the wound edge before the center of the wound is covered by granulation tissue. (Since the grafting procedure in this article was demonstrated on a canine cadaver specimen, no bed of granulation tissue is present. However, the muscle tissue of the forelimb responded similar to granulation tissue during the procedure.)
To decrease the risk of an infection interfering with graft healing, the wound can be bandaged the day before surgery with mesh gauze coated with 0.1% gentamicin sulfate antibiotic ointment. An absorbent secondary wrap and tertiary adhesive wrap are applied over this gauze.
Advantages and disadvantages
Major advantages of strip grafting are that no special equipment is needed and the procedure is easily accomplished. Strip grafts also have an advantage in healing because of the design of the grafts. They can revascularize quickly because they are placed down in grooves.


Thus, vessels can grow into the grafts from not only the bottom of the groove but also from the sides of the groove (A in figure above). Because of their presence in grooves, strip grafts are subject to less damage from bandage movement on the wound surface than sheet grafts are. The open nature of these grafts allows fluid to drain from the wound surface for absorption into the bandage. As the grafts heal, epithelium from the graft edges grows outward to cover the intervening granulation tissue between the grafts (B in figure above). In addition, myofibroblasts in the granulation tissue attach to the edges of the grafts. As they contract, they widen the grafts to help cover the wound.
A disadvantage of these grafts is that bandaging beyond the time of healing (about three weeks) may be necessary to allow for more maturation of the healing process. Also, a study by the author has shown that strip grafts may not be as cosmetically pleasing as mesh grafts or flap reconstructions are.1 The hair regrowth on strip grafts may not be as good as it is on other procedures.
How to place strip skin grafts
After induction and maintenance of general anesthesia, place the dog in lateral recumbency with the affected limb uppermost, unless the wound is on the medial aspect of the limb, in which case, it is easier to place the dog in lateral recumbency with the affected limb down. Prepare the skin around the wound and skin in the cranial, lower lateral, thoracic area for aseptic surgery. Sterile lubricant (Surgilube-Savage Laboratories) and a protective gauze can be placed over the wound to protect it from hair clippings and preparation solutions. The skin in the thoracic area should be prepared wide enough that unprepared skin is not pulled from under the surgical drapes when the graft donor site is closed. Drape the limb wound (recipient site) and the thoracic area (donor site) separately.
Step 1
Figure 1
At the recipient site, incise the granulation tissue parallel to the long axis of the wound using a No. 15 scalpel blade. Make the incisions about 2 mm deep and 3 mm apart. Because of the cutting of the collagen fibers in the granulation tissue, the sides of the incisions usually retract enough to form a groove, which will accommodate a 5-mm-wide strip graft. Having an assistant surgeon press on the wound surface may help you attain hemostasis while the grafts are being harvested.In this case, four parallel incisions were made in the muscle of the wound (Figure 1) to simulate granulation tissue. The tips of the forceps indicate the end of each incision.
Step 2

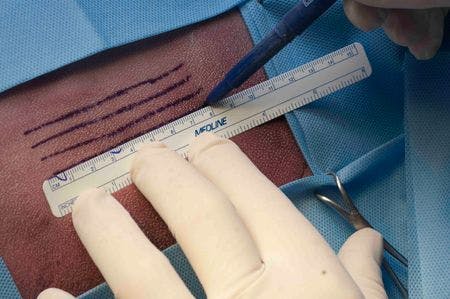

Figure 2A
Figure 2B
At the graft donor site, using a skin marking pen and ruler, draw parallel lines that are 5 mm apart and the length of the wound (Figures 2A & 2B). To contribute to the cosmetics of the final result, the incisions should be made parallel to the direction of hair growth as much as possible. This is usually parallel to the long axis of the body. Draw one more line than the number of grooves you have cut in the granulation tissue at the recipient site.
Step 3
Figure 3
Using a No. 15 scalpel blade, incise the drawn lines (Figure 3). Incisions should begin with the bottom line and progress dorsally. Thus, blood is not running over inked lines to obliterate them before they are incised. This creates the necessary number of strip grafts.
Step 4
Figure 4
Remove subcutaneous fascia, fat, and cutaneous trunci muscle from the grafts. Cut one end of a graft free, leaving the other end attached. Using thumb forceps, grasp the free end of the graft and pull tension on it. Then run scissors down the dermal side of the graft to remove the fascia, fat, and cutaneous trunci muscle (Figure 4).
Step 5
Figure 5
Cut free the remaining attached end of the graft, and trim the graft to the length of one of the grooves in the granulation tissue. By looking carefully at the graft, determine the direction of the angle of the hair shafts. Then place the graft in one of the grooves such that the direction of hair growth on the graft is the same as the direction of hair growth on the skin around the wound (Figure 5; arrow).
Step 6
Figure 6
Place a simple interrupted 3-0 monofilament polypropylene or nylon suture at each end of the graft to anchor it in place (Figure 6; arrows). If you think further immobilization of the graft in the groove is necessary, place similar sutures at intervals along the graft's length. Tie these sutures loosely since they can cut through the granulation tissue and be ineffective if they are tight. Use the minimal number of sutures to ensure graft immobilization.
Step 7
Figure 7
Repeat steps 4 through 6 for each strip graft. The result is a strip graft anchored in each of the granulation tissue grooves (Figure 7).
Step 8
Figure 8A
Suture the graft donor site, which is basically a rectangle surrounded by the loose mobile skin of the thoracic area. Close with simple interrupted 3-0 monofilament polypropylene or nylon sutures. Begin suturing at one corner of the rectangle and proceed from corner to corner in a clockwise fashion. When a V-shaped suture line is present at either end of the defect (Figure 8A), close the remaining defect between the two Vs.
Step 8 cont'd
Figure 8B
The resulting suture line is in the shape of a double Y (Figure 8B).
Postoperative care
Bandage the grafted wound and the donor area. Place a thin, almost imperceptible coating of 0.1% gentamicin sulfate antibiotic ointment on a sterile absorbent nonadherent primary dressing pad. The thin coating allows fluid absorption from the area and provides antibacterial protection for the grafts. Place an absorbent secondary wrap over the primary dressing, followed by a tertiary wrap of 2-in-wide adhesive tape or elastic bandage tape. Use a splint (e.g. a Mason-meta splint) in the bandage to help immobilize the grafted area, especially if the graft has been placed over or near a mobile area. The splint is usually discontinued 10 to 14 days after grafting when the grafts are well advanced in the healing process. A guideline for graft healing is the presence of epithelium growing from the grafts' edges over intervening granulation tissue. This indicates the graft has a blood supply and is well advanced in the healing process.
Change the bandages every day or every other day for the first week. In the early postoperative period, more frequent bandage changes (daily or every other day) may be indicated. This would be if there is considerable fluid production by the wound and danger of graft maceration or the potential for infection. As the grafts heal, as indicated by decreasing fluid production and increasing epithelialization of the granulation tissue between grafts, bandage changes can be less often-every third or fourth day. Clinical judgment should be used in deciding on bandage change frequency. The grafts may appear ischemic for the first two days after placement, progressing to an edematous and cyanotic appearance. As healing occurs, a deep-red-to-pink color replaces the cyanotic color, and the edema regresses.
Sutures can usually be removed seven to 10 days after grafting, and the grafts have usually healed by 21 days after placement. Because of the need for maturation of the healed tissues, bandaging should be continued for another week or two after the grafts have healed for wound protection. However, bandage changes are infrequent (once or twice) during this time. Antibiotic application may be discontinued once the area between the grafts has epithelialized.
Restricted exercise is necessary during healing-cage rest with leashed periodic excursions during the day for elimination, for example. Limited exercise is especially important during the early postoperative period to allow vascular and connective tissue attachments to develop.
< Back
Potential complications
Because of the open nature of this grafting procedure, infection is uncommon. However, when it does occur, the drainage from the wound is tenacious exudate rather than serous drainage. Areas of the graft may be white and lack normal turgor. If an infection is noticed, perform a bacterial culture and antimicrobial sensitivity test, and at bandage changes remove exudate by blotting the graft site with a 1:40 dilution of 2% chlorhexidine diacetate or gluconate solution. Do not scrub the area. Débride any black or white, nonviable portions of the grafts that are not attached. Continue gentamicin topical treatment; however, place it on a more absorbent surgical sponge. The remainder of the bandaging is as previously described. Change the bandages daily until the grafts appear healthy and the exudate has subsided. When the results of the bacterial culture and sensitivity test become available, change the topical antibiotic accordingly.
If the grafts are completely lost, treat the wound as an open wound, allowing it to heal as far as it can by contraction and epithelialization. If healing is insufficient, grafting can be performed again once a healthy, noninfected granulation bed is in place again.
If the dog has a tendency to molest the graft donor site, bandage the site. Place surgical sponges over the suture line, and wrap the thorax with an absorbent bandage wrap from just behind the forelimbs to the level of the last rib. At the cranial edge of the bandage, crisscross two wraps over the cranial shoulder areas and between the forelimbs to form straps that keep the bandage from slipping caudally. Place a tertiary layer of 2-in-wide adhesive tape or elastic tape. Since there is little or no wound drainage, leave the bandage in place for seven days, removing it when the skin sutures are removed.
REFERENCE
1. Swaim SF, Lee AH, Newton JC, et al. Evaluation of strip skin grafts in dogs. J Am Anim Hosp Assoc 1987;23:115.
SUGGESTED READING
1. Bohling MW, Swaim SF. Skin grafts. In: Tobias KM, Johnston SA, eds. Veterinary surgery: small animal. St. Louis, Mo: Elsevier/Saunders, 2012;1271-1290.
2. Swaim SF, Henderson RA. Small animal wound management. 2nd ed. Baltimore, Md: Williams & Wilkins, 1997;295-370.
3. Swaim SF, Welch J, Gillette RL. Management of small animal distal limb injuries. Jackson, Wyo.: Teton New Media, in press.
4. Swaim SF, Renberg WC, Shike KM. Small animal bandaging, casting, and splinting techniques. Ames, Iowa: Wiley-Blackwell, 2011;43-109.


 in general practice")


