Wound repair techniques: Single pedicle advancement flaps
Consider this skin reconstruction technique in patients with square or rectangular defects. This method is especially advantageous when there is skin available on only one side of a wound.
AÂ skin flap is a segment of skin and its underlying connective tissue or panniculus muscle (e.g. cutaneous trunci) that remains attached to a blood supply during its placement into a skin defect. A single pedicle advancement skin flap is a flap that is mobilized by undermining and advancement into a defect without altering the plane of the pedicle.
This technique can be considered for use in repair when there is skin available on only one side of a wound. Basic square or rectangular defects lend themselves well to single pedicle advancement flaps (Figures 1A-1D).

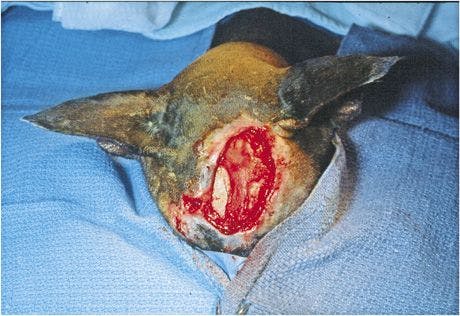
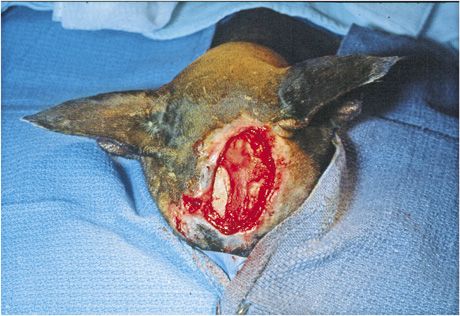
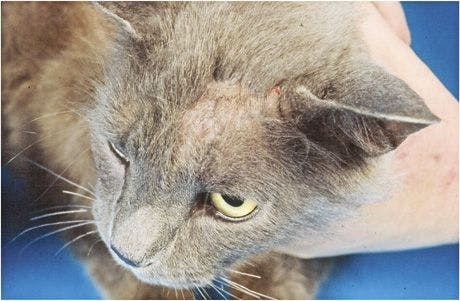
1A. A large wound on the rostrodorsal aspect of a cat's head.


1B. A single pedicle advancement flap drawn on the caudal cranial and cranial cervical skin (F) (arrow indicates direction of flap movement).

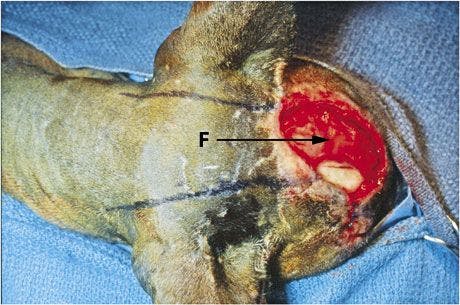
1C. The flap (F) and a small mesh skin graft (G) to close the rostral-most part of the wound (graft made from dog ear after its removal near the base of the flap).


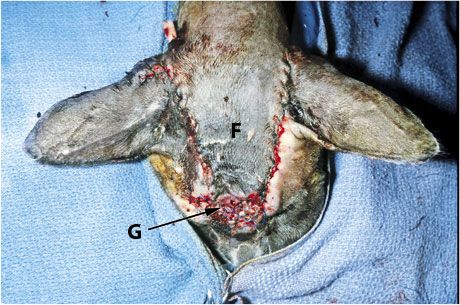
1D. The healed flap and graft.
Preoperative wound treatment
A wound should be treated as an open wound until contamination is eliminated, infection is controlled, and nonviable tissue is removed. Examples are a contaminated traumatic wound or an infected wound.
Use staged débridement and lavage. Remove definitely nonviable tissue and debris at each bandage change. Such tissue is white, dark, or not attached and has no blood supply. Leave tissue with questionable viability, and re-evaluate it the following day.
Along with débridement, perform wound lavage by using either physiologic saline solution or a 1:40 dilution of 2% chlorhexidine diacetate or gluconate solution in sterile water at about 7 to 8 psi of pressure. This can be achieved with a 30-ml syringe and 18-ga needle to deliver the solution.
If you think there is need for topical antibacterial medications (e.g. silver sulfadiazine or nitrofurazone), they can be applied to the wound. However, they are not always necessary or indicated.
Although some topical medications can have a negative effect on certain stages of wound healing (e.g. the negative effect of nitrofurazone on epithelialization1), the primary concern at this point is controlling infection. Systemic antibiotics may also be indicated to treat infected wounds.
Wound healing stimulants can also be applied topically. These stimulate the repair process of healing, which includes early appearance of granulation tissue. Stimulants include an acemannan-containing gel (Carravet Acemannan Wound Gel-Carravet), a maltodextrin NF D-glucose polysaccharide (Intracell-MacLeod Pharmaceuticals), and a tripeptide copper complex (Iamin Hydrating Gel Wound Dressing-Folica).
Advantages and disadvantages
Because flaps have the advantage of carrying their blood supply with them to maintain viability, they can be placed over less-than-optimal wound beds, including exposed bone or irradiated tissue. However, if a healthy bed of granulation tissue can be developed over such tissue, additional vascularization can invade the flap from its dermal surface.
The single pedicle advancement flap is the simplest of local flaps to design and create. However, there is more tension associated with this type of flap than other flaps. This should be kept in mind when considering a single pedicle advancement flap in areas such as eyelids where tension could cause distortion of structures. As with other types of reconstructive surgery, this procedure requires creating a wound to correct a wound.
How to perform a single pedicle advancement flap
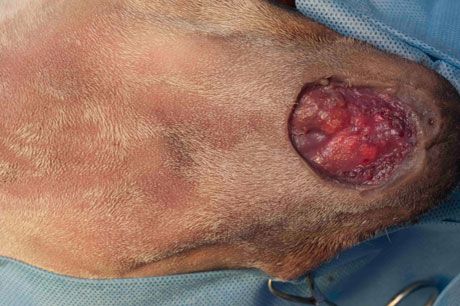
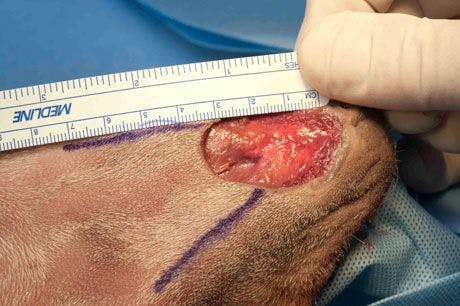
After anesthetizing the patient, position it so that the wound and a large area of surrounding skin can be clipped and prepared for aseptic surgery. It is better to err in favor of preparing too large of an area rather than too small of an area. If an insufficient area is prepared, unprepared skin may be pulled from under the surgical drapes during wound closure. To protect the wound from hair clippings and preparation solutions, sterile lubricant (Surgilube-Savage Laboratories) and a protective gauze can be placed over the wound surface. The wound in this demonstration is in the rostral mandibular area of a cadaver.


Step 1
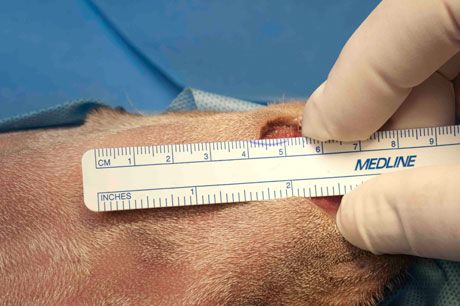
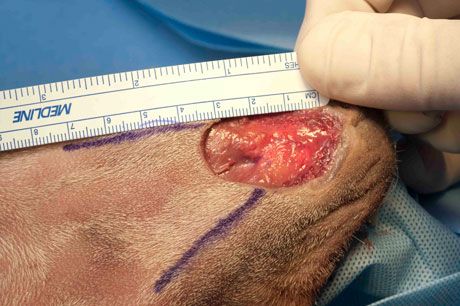
When appropriate, the skin around the wound can be undermined. To determine whether there is sufficient skin to use for a single pedicle advancement flap, evaluate the wound and area around it by measuring the wound:

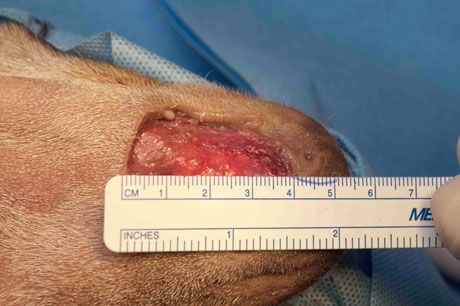
Also, measure and manipulate the skin adjacent to the wound:

Step 2
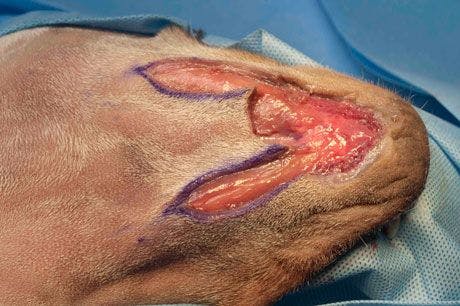
With a sterile surgical marker, draw parallel or slightly divergent incision lines on the skin from two adjacent corners of the wound onto skin from which the flap will be created. The edge of the wound between these lines will be the leading edge of the flap. The length of the flap needs to be to be at least the length of the wound:
Thus, the initial incisions to create the flap are made this length. In general, these incisions will be lengthened in creating the flap (see Step 4).
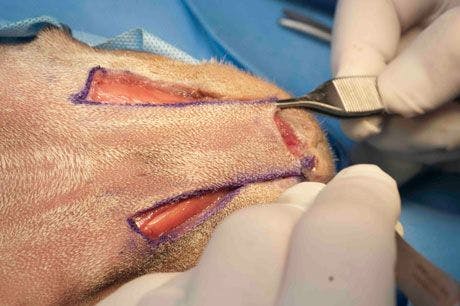
Step 3
Make incisions along the drawn lines, and undermine the skin between them such that subcutaneous tissue or any underlying panniculus muscle is retained with the flap. In the presence of a panniculus muscle, undermining should be deep to this muscle to ensure adequate blood supply to the flap. You will notice that the flap undergoes primary contraction because of contraction and relaxation of collagen and elastin fibers in the dermis. The flap shrinks:

Step 4
Grasp the corners of the flap, and place tension on the flap in an attempt to advance it over the wound:

If the flap is long enough, suturing can be done. However, if there is too much tension and the flap will not extend to the furthest edge of the wound, the original incisions can be extended incrementally, combined with undermining, until the flap can be advanced to cover the wound. Keep in mind that as the length of the flap increases, the chance of vascular insufficiency and necrosis of the leading end of the flap increases.
If you want to enhance the blood supply to a flap to help ensure its survival, consider the delaying technique. Incise the flap, but do not transfer it over the wound. Suture it back in its original position and leave it for about three weeks. At this time, reincise it and transfer it to the wound. Initially, the blood supply to the flap decreases, but it increases to 120% to 150% of normal over the three weeks.2 Thus, 21 days after the initial incision appears to be the optimal time for moving the flap over the wound. The decrease in blood supply at the second incision is much less than after the first incision, resulting in a better chance of flap survival.2
Step 5
Advance the flap in place by using walking sutures of 2-0 or 3-0 absorbable sutures (get a step-by-step of this technique atdvm360.com/WalkingSutures). Suturing begins at the base of the flap, with sutures being placed in rows.
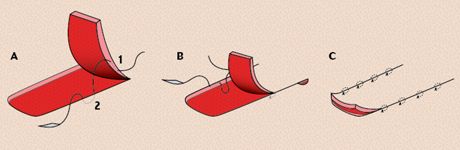
Take the first bite of each suture through the subcutaneous or panniculus muscle into the deep part of the dermis, without penetrating the full thickness of the flap skin (see "1" in photo below). Take the second bite rostral to the first bite in the underlying muscle and fascia of the wound bed (see "2" in photo below).

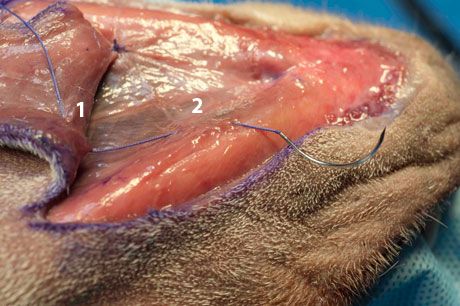
Take care when placing the sutures not to incorporate any large vessels that are supplying the flap. While an assistant surgeon holds the two suture bite areas in apposition, you can tie the suture. The result is advancement of the flap toward the far edge of the wound. After you have placed the necessary number of walking sutures to advance the flap into position, the leading edge of the flap should almost be in contact with the far edge of the wound:

Use walking sutures judiciously, using as few sutures as necessary to advance the flap into position and, thus, helping to avoid any compromised blood supply. There is generally no indication for placing a drain under the flap to avoid serum accumulation. Flap tension and the walking sutures under the flap usually obliterate any dead space in which serum could accumulate.
Step 6
Use simple interrupted sutures of 2-0 or 3-0 nonabsorbable monofilament suture material for final apposition of the skin edges. However, depending on the thickness of the subcutaneous or panniculus layers, an additional deeper layer of sutures may be required around the flap edges before the apposition sutures are placed.
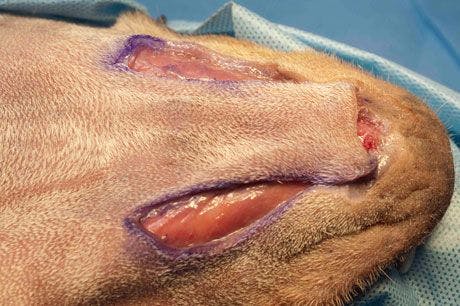
The flap is under tension, and the skin on either side of the flap is relaxed. Thus, when the suturing is completed, there will be two "dog ears" in the skin adjacent to the base of the flap (see arrows in the left photo below):
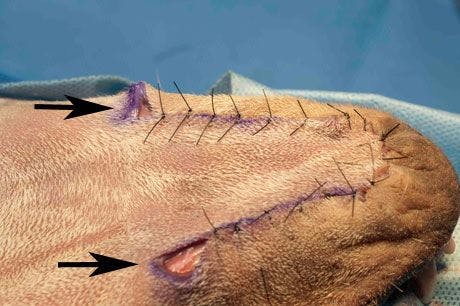

These dog ears can be surgically removed (Figure 2).

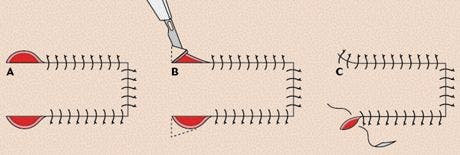
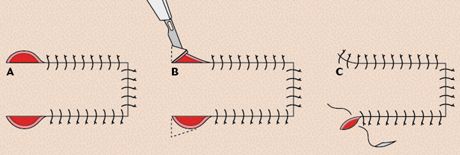
2. Dog ear removal from the base of a single pedicle advancement flap. (A) The dog ears adjacent to the base of the flap. (B) Incising the dog ear skin. The broken lines indicate incision lines. (C) Closure of the defects after dog ear removal.
If you choose to remove them at this time, it is important to make cuts outside of the base of the flap and not into the base of the flap, which could compromise the flap's blood supply. However, I prefer to suture the edges together and evaluate them in about two weeks to determine whether they need to be surgically corrected:


The dog ears generally regress over this time and do not need correction.
Postoperative care
If there is concern about the animal molesting the surgical area, it can be covered with a bandage if it is in an area amenable to bandaging. A bandage is also indicated if a drain has been placed under a flap. The amount and nature of drainage can be assessed at bandage change. The drain should be removed when drainage has decreased to a small amount, generally in three to four days. If the surgical site is in an area that cannot be bandaged, wound molestation can be prevented by use of an Elizabethan collar.
References
1. MacPhail CM. Surgery of the integumentary system. In: Fossum TW, ed. Small animal surgery. 4th ed. St. Louis, Mo: Elsevier/Mosby, 2013;190-288.
2. Hunt GB. Local or subdermal plexus flaps. In: Tobias KM, Johnston SA, eds. Veterinary surgery: small animal. St. Louis, Mo: Elsevier/Saunders, 2012;1243-1255.
Suggested reading
> Pavletic MM. Atlas of small animal wound management and reconstructive surgery. 3rd ed. Ames, Iowa: Wiley-Blackwell, 2010.
> Swaim SF, Henderson RA. Various shaped wounds. In: Small animal wound management. 2nd ed. Baltimore, Md: Williams & Wilkins, 1997;235-274.
Flap design and suturing modifications
Some modifications can be made in flap design and suturing technique that help relieve tension and that can be used to move the flap over the wound, respectively.
Designs to help relieve tension
Pantographic expansion. Pantographic expansion can be used to help get some additional length on the flap and, thus, relieve tension on the flap. Make the sides of the flap slightly divergent to widen the base and ensure that the flap pedicle is not narrowed as it is developed. Small back-cuts can be made from either side into the flap's base. These open and approach, forming a straight line as the flap is advanced into position, making advancement easier (Figure 3). The longer the back-cuts are made, the easier the flap advances; however, long back-cuts reduce the vascular area at the flap's base. Thus, back-cuts should be made judiciously.


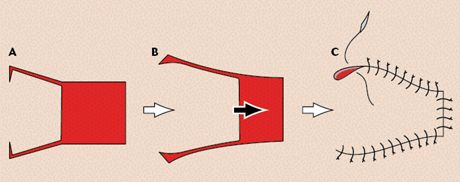
3. Pantographic expansion of a single pedicle advancement flap. (A) The sides of the flap are divergent with back-cuts into the flap's base. (B) As the flap advances, the back-cuts open to approach a straight line. (C) The flap sutured in place.
H-plasty. H-plasty can be used to reduce the tension that would be present if only one flap were used. With this method, two apposing single pedicle advancement flaps are designed. Each flap covers half of the wound, reducing tension. The technique requires having skin available for reconstruction on two sides of the wound. The resulting suture line as the flaps are sutured together is H-shaped, thus the term H-plasty for the technique.
With this technique, the incisions to create the flaps are made as long as the length of the defect. This helps ensure that the defect closes without tension (Figure 4). If there is any tension at the suture line where the flaps join, some vertical mattress tension sutures can be placed in addition to skin apposition sutures. As an alternative, walking sutures can be used to move the flaps together and overcome tension.

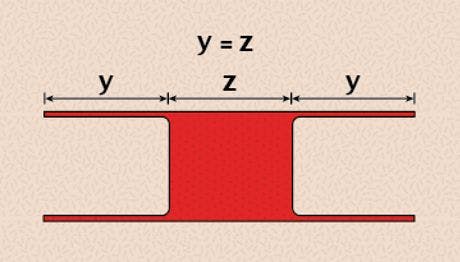
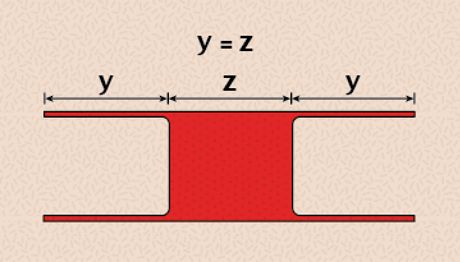
4. H-plasty. (A) Each flap is equal in length to the width of the defect (Y = Z).
Sutures to advance flaps
Modified walking sutures. When a flap is being advanced to provide coverage over exposed bone, the usual walking suture pattern cannot be used since the second suture bite cannot be taken in bone. Therefore, a modified walking suture can be used to advance the flap into place. This modification can also be used if there is any concern about the first bite of a regular walking suture obstructing the vascularity of a flap.
Beginning at the base of the flap, and using 3-0 absorbable suture, take the first bite intradermally at the edge of the flap and the second bite in an advanced location in the adjacent skin edge. As you tie the suture, you advance a segment of the flap toward the wound. Continue suturing on alternate sides of the flap, gradually advancing the flap over the defect (Figure 5). Final skin apposition is with 3-0 nonabsorbable simple interrupted sutures.
With use of the modified walking sutures at the edges of the flap, there may be dead space under the flap. If necessary, a drain can be placed under the flap to allow drainage of any fluid from under the flap.


5. Modified walking sutures to advance a single pedicle advancement flap into position. (A) The first intradermal bite (1) is in the edge of the flap, and the second intradermal bite (2) is advanced and in the edge of adjacent skin. (B) The second walking suture being placed in the opposite side of the wound. (C) Walking sutures have advanced the flap into position.


 in general practice")


