3 reconstruction techniques to close problem wounds
Three beneficial reconstructive surgery techniques--the adjustable horizontal mattress suture, the mesh skin graft, and punch grafts in pockets--are underused by practitioners. These techniques require no special equipment and are easily accomplished.
Some wounds in dogs and cats are a challenge to close because of their size or location. Three beneficial reconstructive surgery techniques—the adjustable horizontal mattress suture, the mesh skin graft, and punch grafts in pockets—are underused by practitioners. These techniques require no special equipment and are easily accomplished.


Steven F. Swaim, DVM, MS
ADJUSTABLE HORIZONTAL MATTRESS SUTURE
Consider using the adjustable horizontal mattress suture technique when the skin around a wound can be stretched to close it. The procedure lends itself well to use on distal limb wounds, such as automobile-induced degloving injuries, in dogs.
Technique overview
After performing appropriate wound management, place a continuous intradermal suture with 2.0 monofilament (nylon or polypropylene) along the wound's length. Place a small sewing button on each end of the suture, extending from the wound's ends. Apply even tension on the suture ends to carefully pull the wound edges as close together as possible. Next, place small removable fishing weights, or split shots, on the suture adjacent to the buttons to hold the suture tension. Over time, stress relaxation in the skin occurs. Daily tightening of the suture gradually pulls the wound edges closer together and may result in full wound closure.
Advantages and important pointers
Using this technique, I have been able to close many distal limb wounds much faster than if I had treated them as open wounds and allowed them to heal by second intention. Early wound closure is pleasing for all concerned—the animal, pet owner, and veterinarian. In addition, open wound therapy can be applied while the wound edges are being pulled together.
A biologic tourniquet can result if the suture is pulled too tight. But because the suture is adjustable, it can be loosened, and a slower rate of tightening can be started at a later time. Also, be cautious not to use the technique on a limb wound that is very wide because the suture could cut into underlying tissue as it is tightened.
MESH SKIN GRAFT
When faced with a distal limb wound of such a magnitude that stretching the surrounding skin for closure is out of the question, you must consider replacing the skin. Skin replacement is also needed if a wound has healed as much as it can by second intention and there is insufficient skin for complete healing. In such instances, consider a mesh skin graft. The term skin graft often causes trepidation. However, a graft can be done with no special skill and by using everyday equipment.
Technique overview
After a healthy wound bed has been established, prepare the area around the wound and a ventral craniolateral thoracic donor area for aseptic surgery. Cut a pattern of the wound from a sterile cloth, towel, or glove wrapper. While the pattern is still on the wound, mark the side of the pattern that faces away from the wound, and be careful not to turn the pattern over when transferring it to the donor site. Thus, you don't inadvertently excise a mirror image graft. Trace the pattern on the donor site by dipping a sterile toothpick in sterile methylene blue.
After cutting the graft and removing it from the donor area, stretch it on a piece of sterile, corrugated cardboard by using hypodermic needles. Remove all subcutaneous tissue with scissors and thumb forceps, and make staggered, parallel rows of 1-cm-long incisions with a No. 11 scalpel blade to mesh the graft. Remove the graft from the cardboard, place it on the wound, and suture or staple it to the wound edges. Place interrupted tacking sutures between some mesh holes to immobilize the graft on the wound.
Apply a thin layer of 0.1% gentamicin sulfate ointment to a sterile, nonadherent absorbent bandage before placing it over the graft. Then place the secondary and tertiary bandage layers. Change the bandage daily the first week, every other day the second week, and once or twice the third week.
Advantages and important pointers
Over the years, I have had good success with mesh grafts, getting about 95% to 100% of the grafts to take or heal (Figures 1A & 1B). This degree of success has also been attained by faculty colleagues, surgical residents, and private practitioners. The success of mesh grafts is attributed to overcoming the three main reasons grafts do not take or heal.
- First, meshing allows drainage of any hemorrhage from under the graft that would separate the graft from the wound. Thus, the graft revascularizes quickly as it lies in contact with the wound.
- Second, any exudate that might be associated with the wound can drain away into a bandage. If it accumulated under a graft, exudate could also separate the graft from the wound and interfere with revascularization. In addition, exudate contains enzymes that can digest the fibrin that helps hold a graft in place.
- Third, tacking sutures can be placed to immobilize the graft without the concern of hemorrhage from suture placement accumulating under the graft.


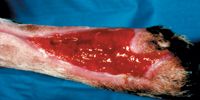
Figure 1A. A degloving wound on a dogâÂÂs distal limb.
I have also noted that mesh grafts heal or take more quickly in cats than in dogs. This is attributed to the thinner skin of cats, which revascularizes faster.


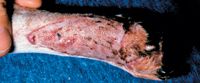
Figure 1B. After the wound on the dog in Figure 1A healed as much as possible by second intention, final closure was accomplished with a mesh graft.
One disadvantage of skin grafts compared with skin flaps is that more bandaging is required. Also, occasionally, a graft will have a partial-thickness take, whereby the lower dermal tissues revascularize and that part of the graft and its adnexal content survive. However, the epidermis and upper portion of the dermis die, forming a hard crust (eschar) over the graft or certain parts of the graft. Do not give up on such a graft. When the eschar sloughs, viable skin graft will be under it. The part of the dermis that revascularizes will be viable and will epithelialize from the adnexal structures it contains. Thus, it is a viable graft, but it will have sparse hair growth because of the loss of some hair follicles in the sloughed upper dermis.
PUNCH GRAFTS IN POCKETS
Wounds that are in an area that is difficult to bandage or immobilize are a big challenge. Punch grafts placed in pockets provide a means of closing these wounds while letting the wound tissue act as a bandage.
Technique overview
Treat the wound as an open wound until a healthy bed of granulation tissue is present. Then prepare a graft donor area on the ventral craniolateral thoracic area. Starting at the top of the wound, make a row of slitlike pockets in the granulation tissue by inserting a No. 15 scalpel blade down into the granulation tissue almost parallel to the surface of the wound with the openings upward. Using a 6- to 8-mm-diameter skin biopsy punch, harvest grafts from the donor area. After making each pocket, place a graft in it. Close each donor area with a simple interrupted suture.

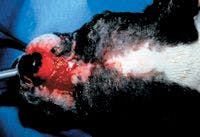
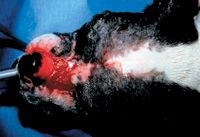
Figure 2A. A bed of granulation tissue over the dorsum of a dog's nasal area.
Advantages and important pointers
I have used the punch grafts in pockets technique in such wounds as an axillary wound in a dog and a wound over the nasal bones of a dog (Figures 2A-2C). The granulation tissue pockets hold the grafts in place as they revascularize and heal. The pockets regress as the grafts heal in place, and epithelium spreads from the grafts to provide further wound coverage.

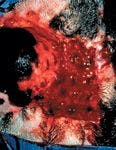

Figure 2B. The dorsal nasal area of the dog in Figure 2A after punch grafts have been placed in pockets.
Because the granulation tissue of the pocket is the bandage for the grafts, it is necessary to have a restraint, such as an Elizabethan collar, to prevent wound molestation as the grafts heal. If a scab forms over the grafted wound, it should not be disturbed; it serves as a bandage. Remember, although wound closure is provided, the cosmetic appearance of the wound will not be as good as with other forms of reconstruction.

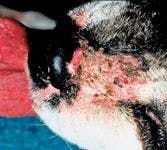

Figure 2C. The dorsal nasal area of the dog in Figures 2A & 2B after the punch grafts have healed.
Steven F. Swaim, DVM, MS, professor emeritus, College of Veterinary MedicineÂ, Auburn University, AL 36849.
SUGGESTED READING
1. Scardino MS, Swaim SF, Henderson RA, et al. Enhancing wound closure on the limbs. Compend Contin Educ Pract Vet 1996;18:919-933.
2. Swaim SF. Skin grafts. In: Slatter DH, ed. Textbook of small animal surgery. 3rd ed. Philadelphia, Pa: WB Saunders, 2003;321-338.
3. Pavletic MM. Atlas of small animal reconstructive surgery. 2nd ed. Philadelphia, Pa: WB Saunders, 1999.

 in general practice")


