Skills Laboratory: Eyelid laceration repair: A step-by-step guide
Use care when repairing lacerations of the eyelid to ensure that functionality of the eye and cosmetic appeal are maintained for the patient.
The surgical repair of eyelid lacerations differs somewhat from that of most skin lacerations. The reasons for this include the need to maintain a functional eyelid and ensure a cosmetic outcome as well as the fact that the eyelid is more vascularized than many other skin regions.
Background info
A functional upper eyelid is essential to maintain the health of the globe itself. If the eyelid is incomplete or immobile, it is unable to physically protect the eye and is unable to spread the tear film over the ocular surface.
In most species, the upper eyelid is more mobile and, therefore, more important in protecting the eye than the lower eyelid. Animals that are unable to spread tears have a severe keratoconjunctivitis even though they may have normal tear production (as measured by Schirmer tear tests). This causes severe drying of the cornea, which often leads to nonhealing corneal ulcers and eventually loss of corneal integrity. Because of this, all full-thickness eyelid lacerations must be repaired surgically, either by primary closure or by grafting.
In most dogs, except those with redundant eyelids (e.g. Shar-Peis, basset hounds), lacerations in which more than one-third of the eyelid margin is missing cannot be repaired by primary closure but require the use of a grafting technique to establish a functional eyelid. Thus, in order to maintain eyelid function, débridement of wounds must be minimal.
Surgical considerations
Cosmesis is an important factor when performing eyelid surgeries. Owners may carefully inspect wound closures and look at their dogs’ eyes on a daily basis. Although it may be functional, a poorly aligned eyelid is often a constant reminder of “sloppy work” to an owner. Thus, every effort should be made to achieve the most cosmetic closure possible. In order to do this, using magnification and bright light is recommended for suturing as well as the use of appropriate ophthalmic instruments.
Fortunately, the eyelids are highly vascularized, so primary closure may be achieved more effectively than in other cutaneous regions. Small, triangular-shaped flaps of skin that might necrose elsewhere often survive quite well in the eyelid (Figure 1). This allows for the salvaging of skin that would need débridement in other less-vascularized cutaneous lesions. The downside of having this blood supply is that the eyelids will bleed markedly when cut, which may obscure visualization of the surgery site.
Reconstruction of an eyelid after a traumatic laceration can be straightforward or challenging. The objectives of all eyelid laceration repairs are to achieve the best possible alignment, to protect the eye from further trauma during suturing, and keep any suture material from rubbing on the cornea once the repair is complete.

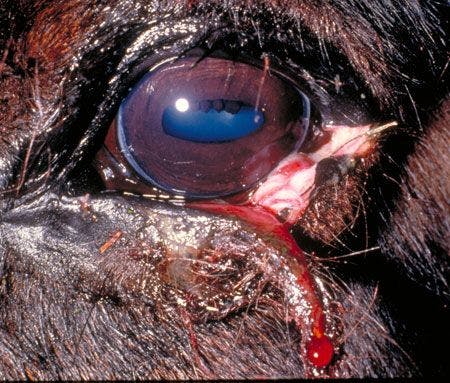

Figure 1: A lower eyelid laceration in a horse. Notice how narrow the lacerated eyelid tissue piece is near the lateral canthus. The eyelid has an excellent blood supply, so there is no need to trim off this piece unless it is obviously necrotic. (All photos courtesy of Dr. Juliet Gionfriddo.)
Go to the next page to see a step-by-step guide to eyelid laceration repair.
Step 1
Anesthetize the animal, and assess the wound for feasibility of closure by primary suturing. If this is not possible, the animal should be referred for eyelid grafting and reconstruction. Referral to a veterinary ophthalmology specialist for eyelid laceration closure is always appropriate and must be offered to owners in patients with large eyelid lacerations or marked loss of eyelid tissue.
Step 2
Only minimal, gentle clipping and cleaning should be performed. Place topical, ocular lubricant ointment in the eye to protect it during this process. Manually remove large clumps of hair and debris, and flush out fine debris using gentle irrigation with sterile saline solution. Cut the eyelashes with small scissors coated with ophthalmic ointment to catch the cut hairs. After clipping, gently clean the area with dilute (1:2) baby shampoo followed by dilute (1:50) povidone-iodine solution (do not use an iodine scrub) (Figure 2). Special ocular drapes that stick on the skin (Figure 3) or disposable paper drapes from which a hole a little larger than the size of the eye has been cut can be used to cover the face.

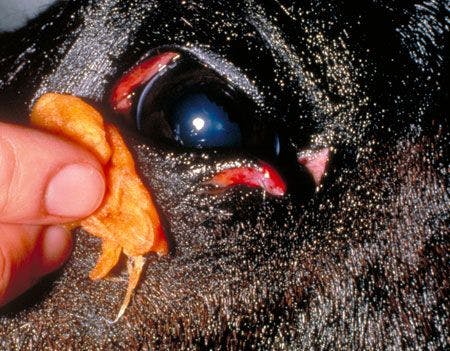

Figure 2

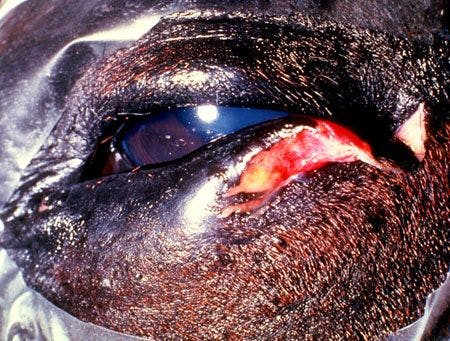

Figure 3
Step 3
A one- or two-layer closure can be performed. I prefer a two-layer closure because I think this method provides the best strength and apposition. The first layer of closure is the muscle and subcutaneous tissue. Use small-gauge absorbable suture material, such as 5-0 Dexon (Covidien) or Vicryl (Ethicon), in a simple continuous pattern. (These suture materials have a small swaged needle.)
Place the first suture in this layer close to the eyelid margin so that it exactly apposes the two sides. Sometimes this requires minor trimming, as one side of the laceration may be longer and thinner than the other. In some cases (e.g. oblique laceration), one side of the lacerated eyelid skin margin can be slid slightly over the other.
While suturing this layer, it is important to make sure that the suture material stays in the subcutaneous and subconjunctival tissues and does not penetrate the conjunctiva. The knots on either end of the laceration should be buried in the tissue and should never rub on the cornea (Figure 4).

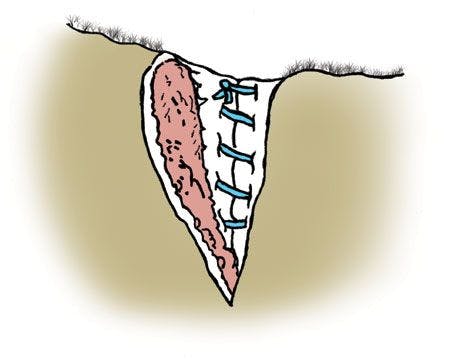

Figure 4
Step 4
Closure of the skin is important to the strength and cosmesis of the eyelid. I use 5-0 nylon suture material in the skin layer, but many people use 5-0 silk. First, close the eyelid margin, apposing the edges precisely (Figures 5 & 6). You can align the margin manually and place a suture in the skin directly anterior to the margin. This has to be done with great care so as not to place a knot in a position where it can rub on the cornea. The margin in this illustration has been closed with a suture whose knot is just below the eyelid margin, and the ends are cut very short so as not to rub on the cornea. This method should not be used if there is a tendency for the eyelid to roll in after the surgery, as the knot could rub on the cornea. The remainder of the eyelid is closed with a simple interrupted suture pattern.


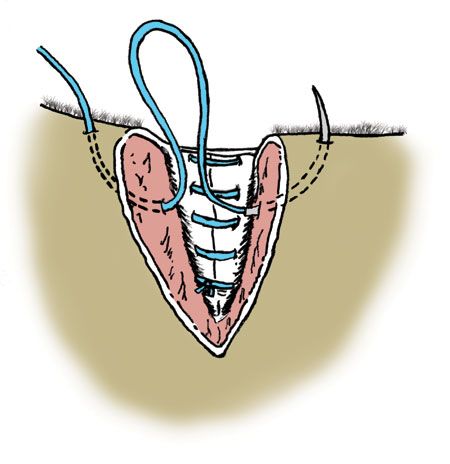
Figure 5


Figure 6
Step 4, cont'd.
An alternative to this method is the figure-of-eight suturing pattern (Figure 7). This method is more difficult to place but is safer in that it allows you to tie the marginal knot well below the margin. It is very important when using this method to not take large bites and to place the sutures at exactly the same points away from the eyelid margins on each side of the suture line.
After placing the first knot, the rest of the defect is closed with a simple interrupted pattern (Figure 8). The suture ends closest to the eyelid can be cut very short so they do not rub on the eye. Alternately, they can be left long and caught up in the sutures distal to it.
The secret to obtaining perfect alignment of the eyelid is to use small suture material, take small bites, and place the sutures relatively close together. This allows you to “take up” small areas where the skin might wrinkle.

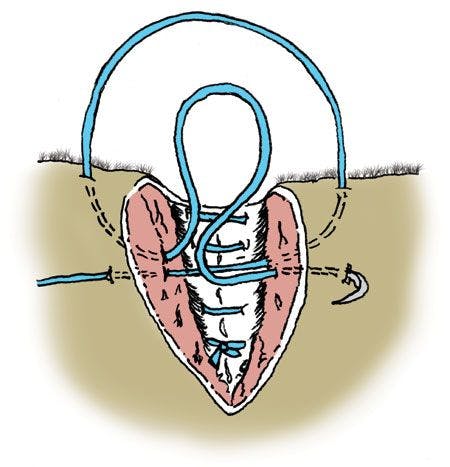

Figure 7


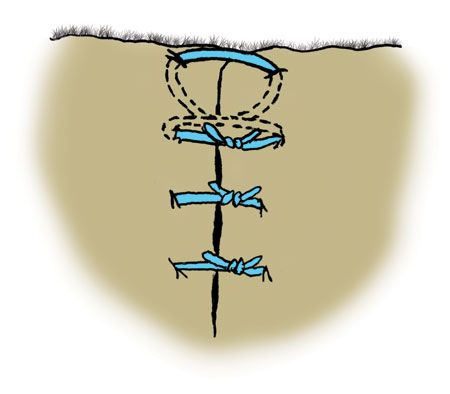
Figure 8
Postoperative care
The completed repair should achieve perfect alignment (Figure 9). Aftercare includes the administration of broad-spectrum systemic antibiotics and a topical triple antibiotic ophthalmic ointment three to four times daily in the affected eye. The patient should have an Elizabethan collar in place to prevent rubbing of the suture line, which could lead to loosening of the sutures, swelling, infection, and corneal laceration.


Figure 9


 in general practice")


")

